


Generative AI models like Anthropic’s Claude excel at interpreting natural language prompts and providing well-reasoned responses; however, these models lack direct access to business data and cannot independently take action to modify business systems.
This is changing with the introduction of “tool use” capabilities, enabling AI models to interact with external tools. For example, developers can now empower models like Claude to update Salesforce, respond to Zendesk tickets, query internal databases, and more.
Tool use involves four key steps:
- Tool Definition: Developers define a tool (name, description, schema) and make it accessible via an API.
- Tool Request: When the AI model determines that a tool is required for a task, it returns a response indicating it would like to use the tool.
- Tool Execution: The developer’s code executes the tool, such as fetching data, updating a system, or invoking another model.
- Response Handling: Developers decide how to handle the tool's output—returning it to the model for further reasoning or delivering it directly to the user.
While tool use has massive potential, enabling tool use requires developers to expose tools, handle execution, and manage responses—all of which can be complex and time-consuming.
Fortunately, we can use Superblocks to implement tool use in production with minimal overhead.
We can use Superblocks to:
- Orchestrate AI and tool use workflows: Streamline communication between AI models and external tools in a single Superblocks API
- Execute tools seamlessly: Avoid building standalone services for data fetching and system updates, using our existing integrations in Superblocks with core systems
- Expose results in a clean user interface: Integrate responses directly into app UIs, whether via Chat interfaces or any other components
The accompanying video demonstrates this symbiosis in action. We take simple natural language prompts and turn these into precise updates across Salesforce and our databases, draft emails, and filter tables - bridging the gap between human intention and technological execution.
Let’s explore how we used Superblocks and Claude to create an AI agent for our Sales team that minimizes the manual work required to sync Postgres and Salesforce.
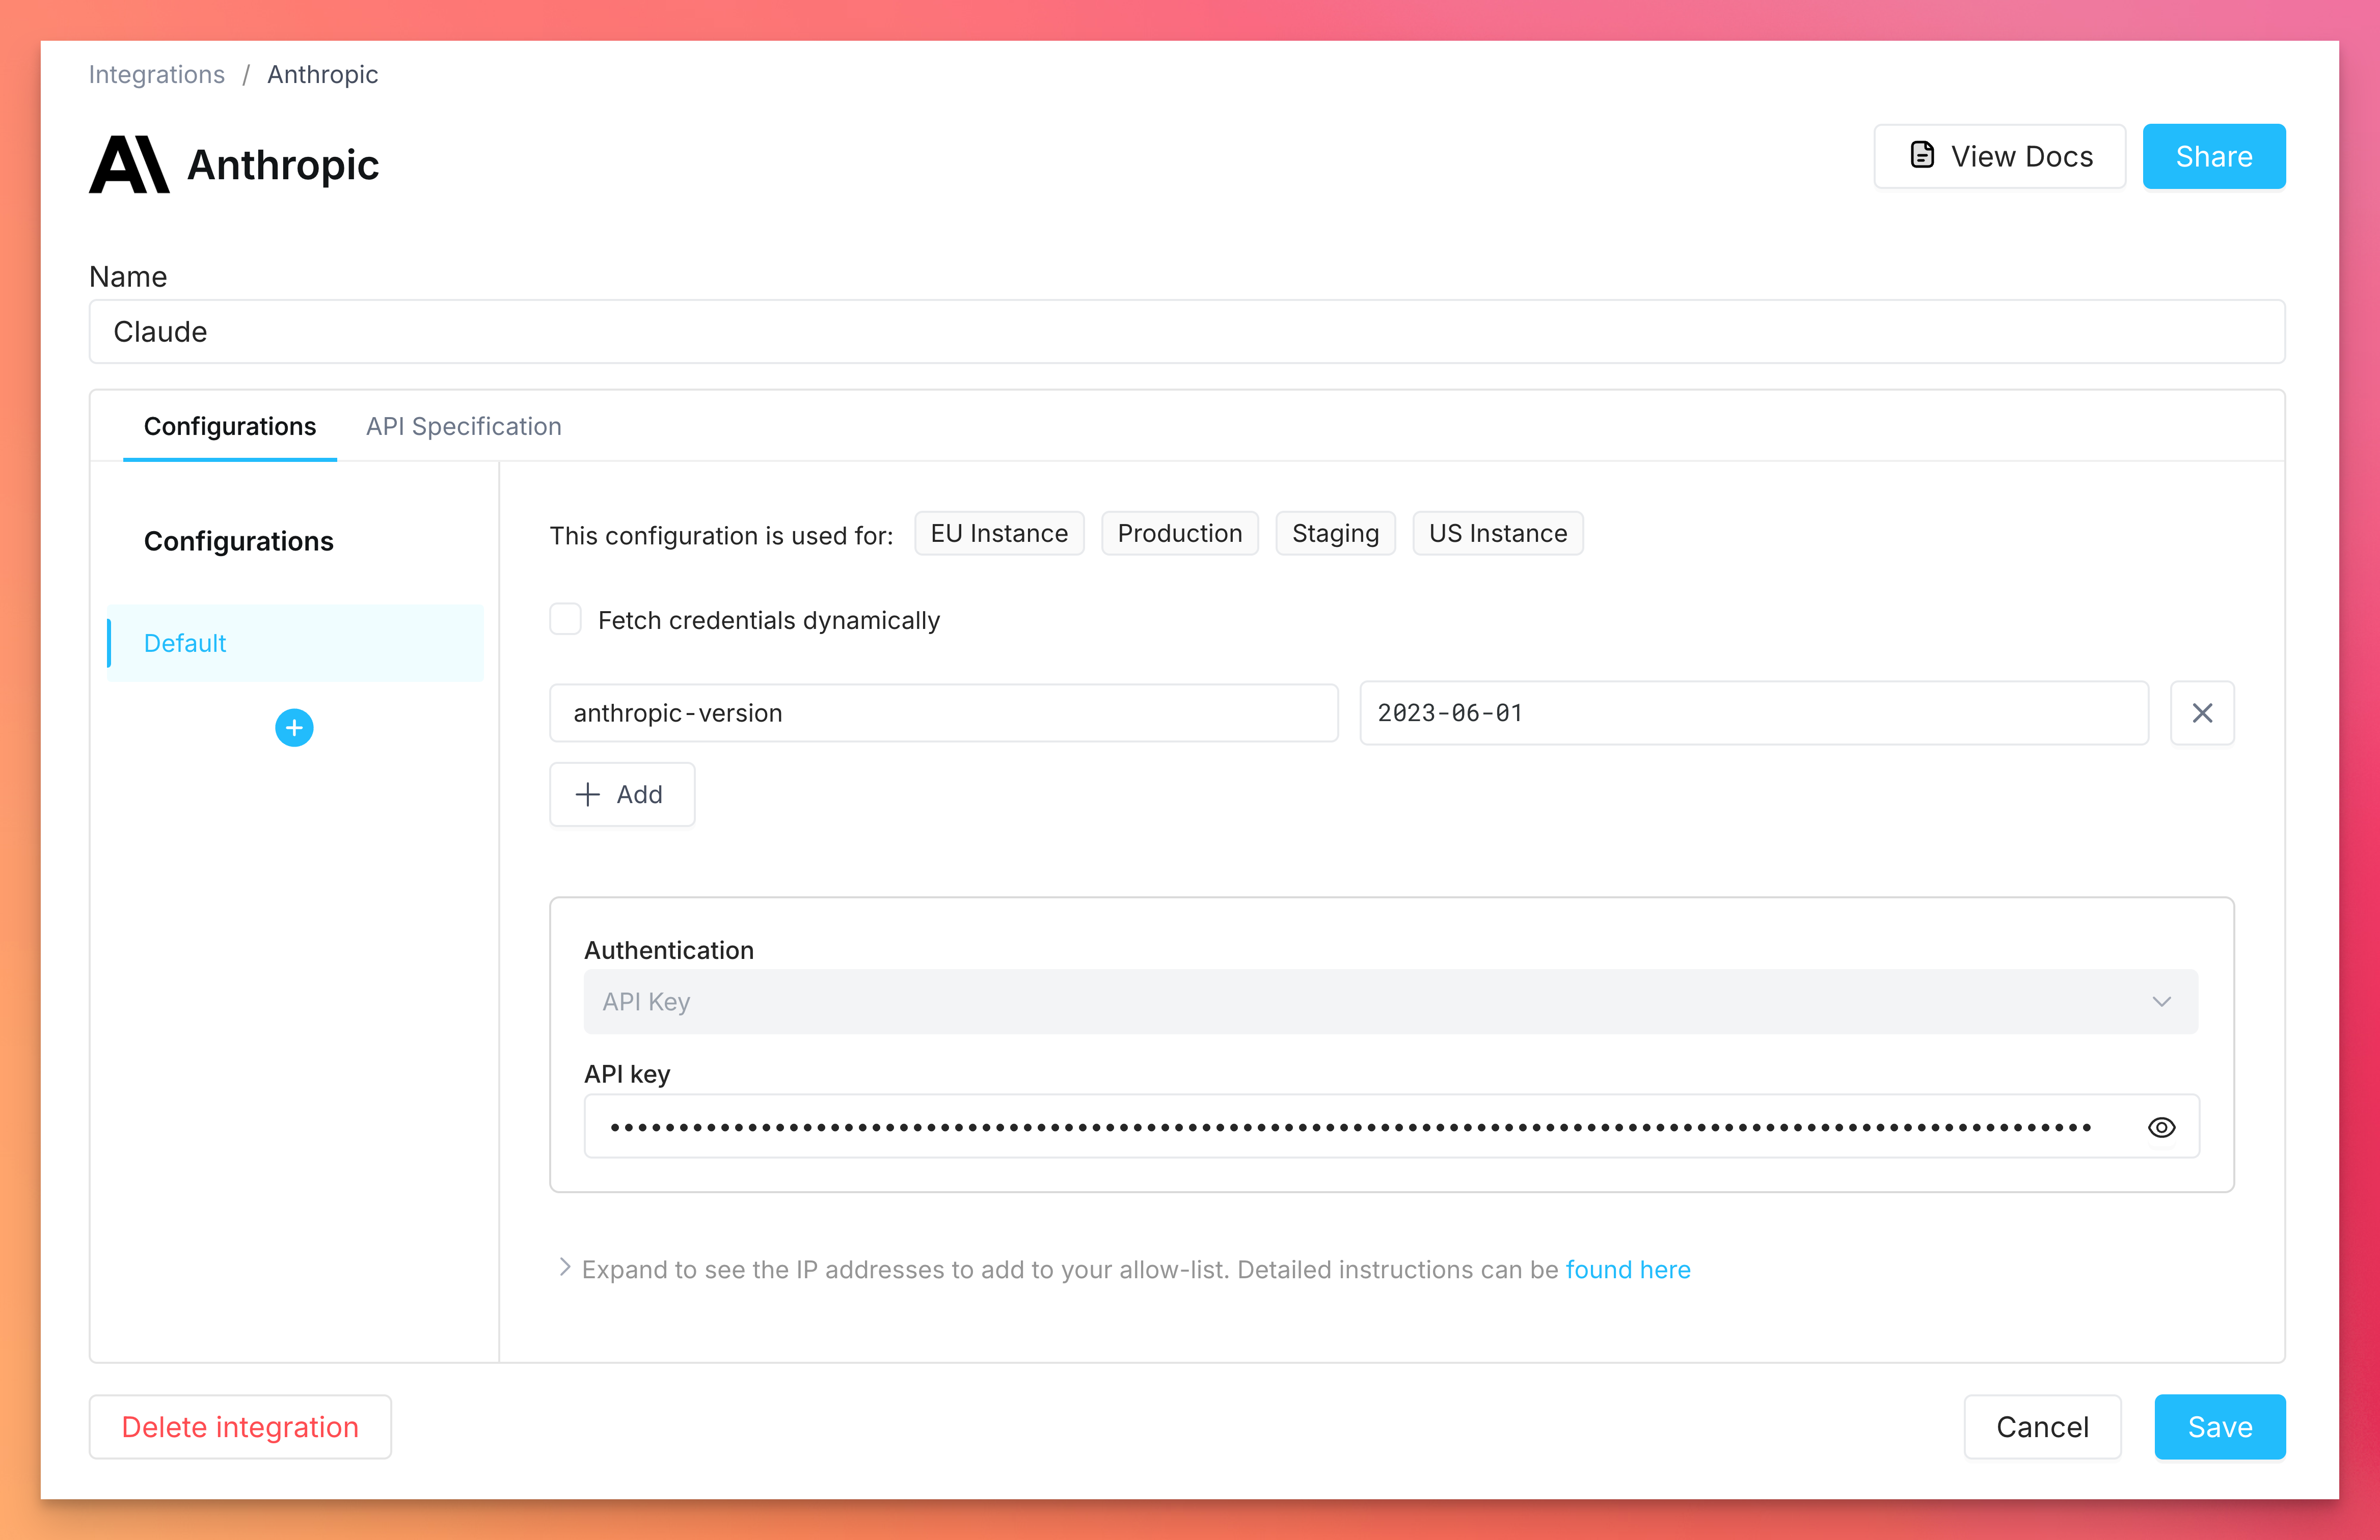
Step 1: Set up Superblocks Anthropic integration
Naturally, the first step is to set up your Anthropic connection within Superblocks. You can do this by configuring an Anthropic integration using your Anthropic API key.
Step 2: Create a Superblocks Workflow to add to Claude’s tool belt
Next, we'll need to create a workflow that dictates what actions our agent can take. Workflows in Superblocks work well as an API layer as they are simple to set up, always available, and able to interact with any data connection you have set up within Superblocks. Additionally, workflows are fully governed and can adhere to your organization's RBAC policies.
We'll create a workflow for a tool that we'll provide to the AI model. In this case, we create an updateAccount workflow that updates SFDC and our Postgres DB. This workflow is just one of many tools we’ll eventually provide to Claude.
To create a workflow, navigate to the Superblocks home page, click Create New, and choose Workflow. Here we're creating flows that make updates to Salesforce and Postgres based on the user inputs.
We’ll expose this tool in our LLM call to Claude a bit later.
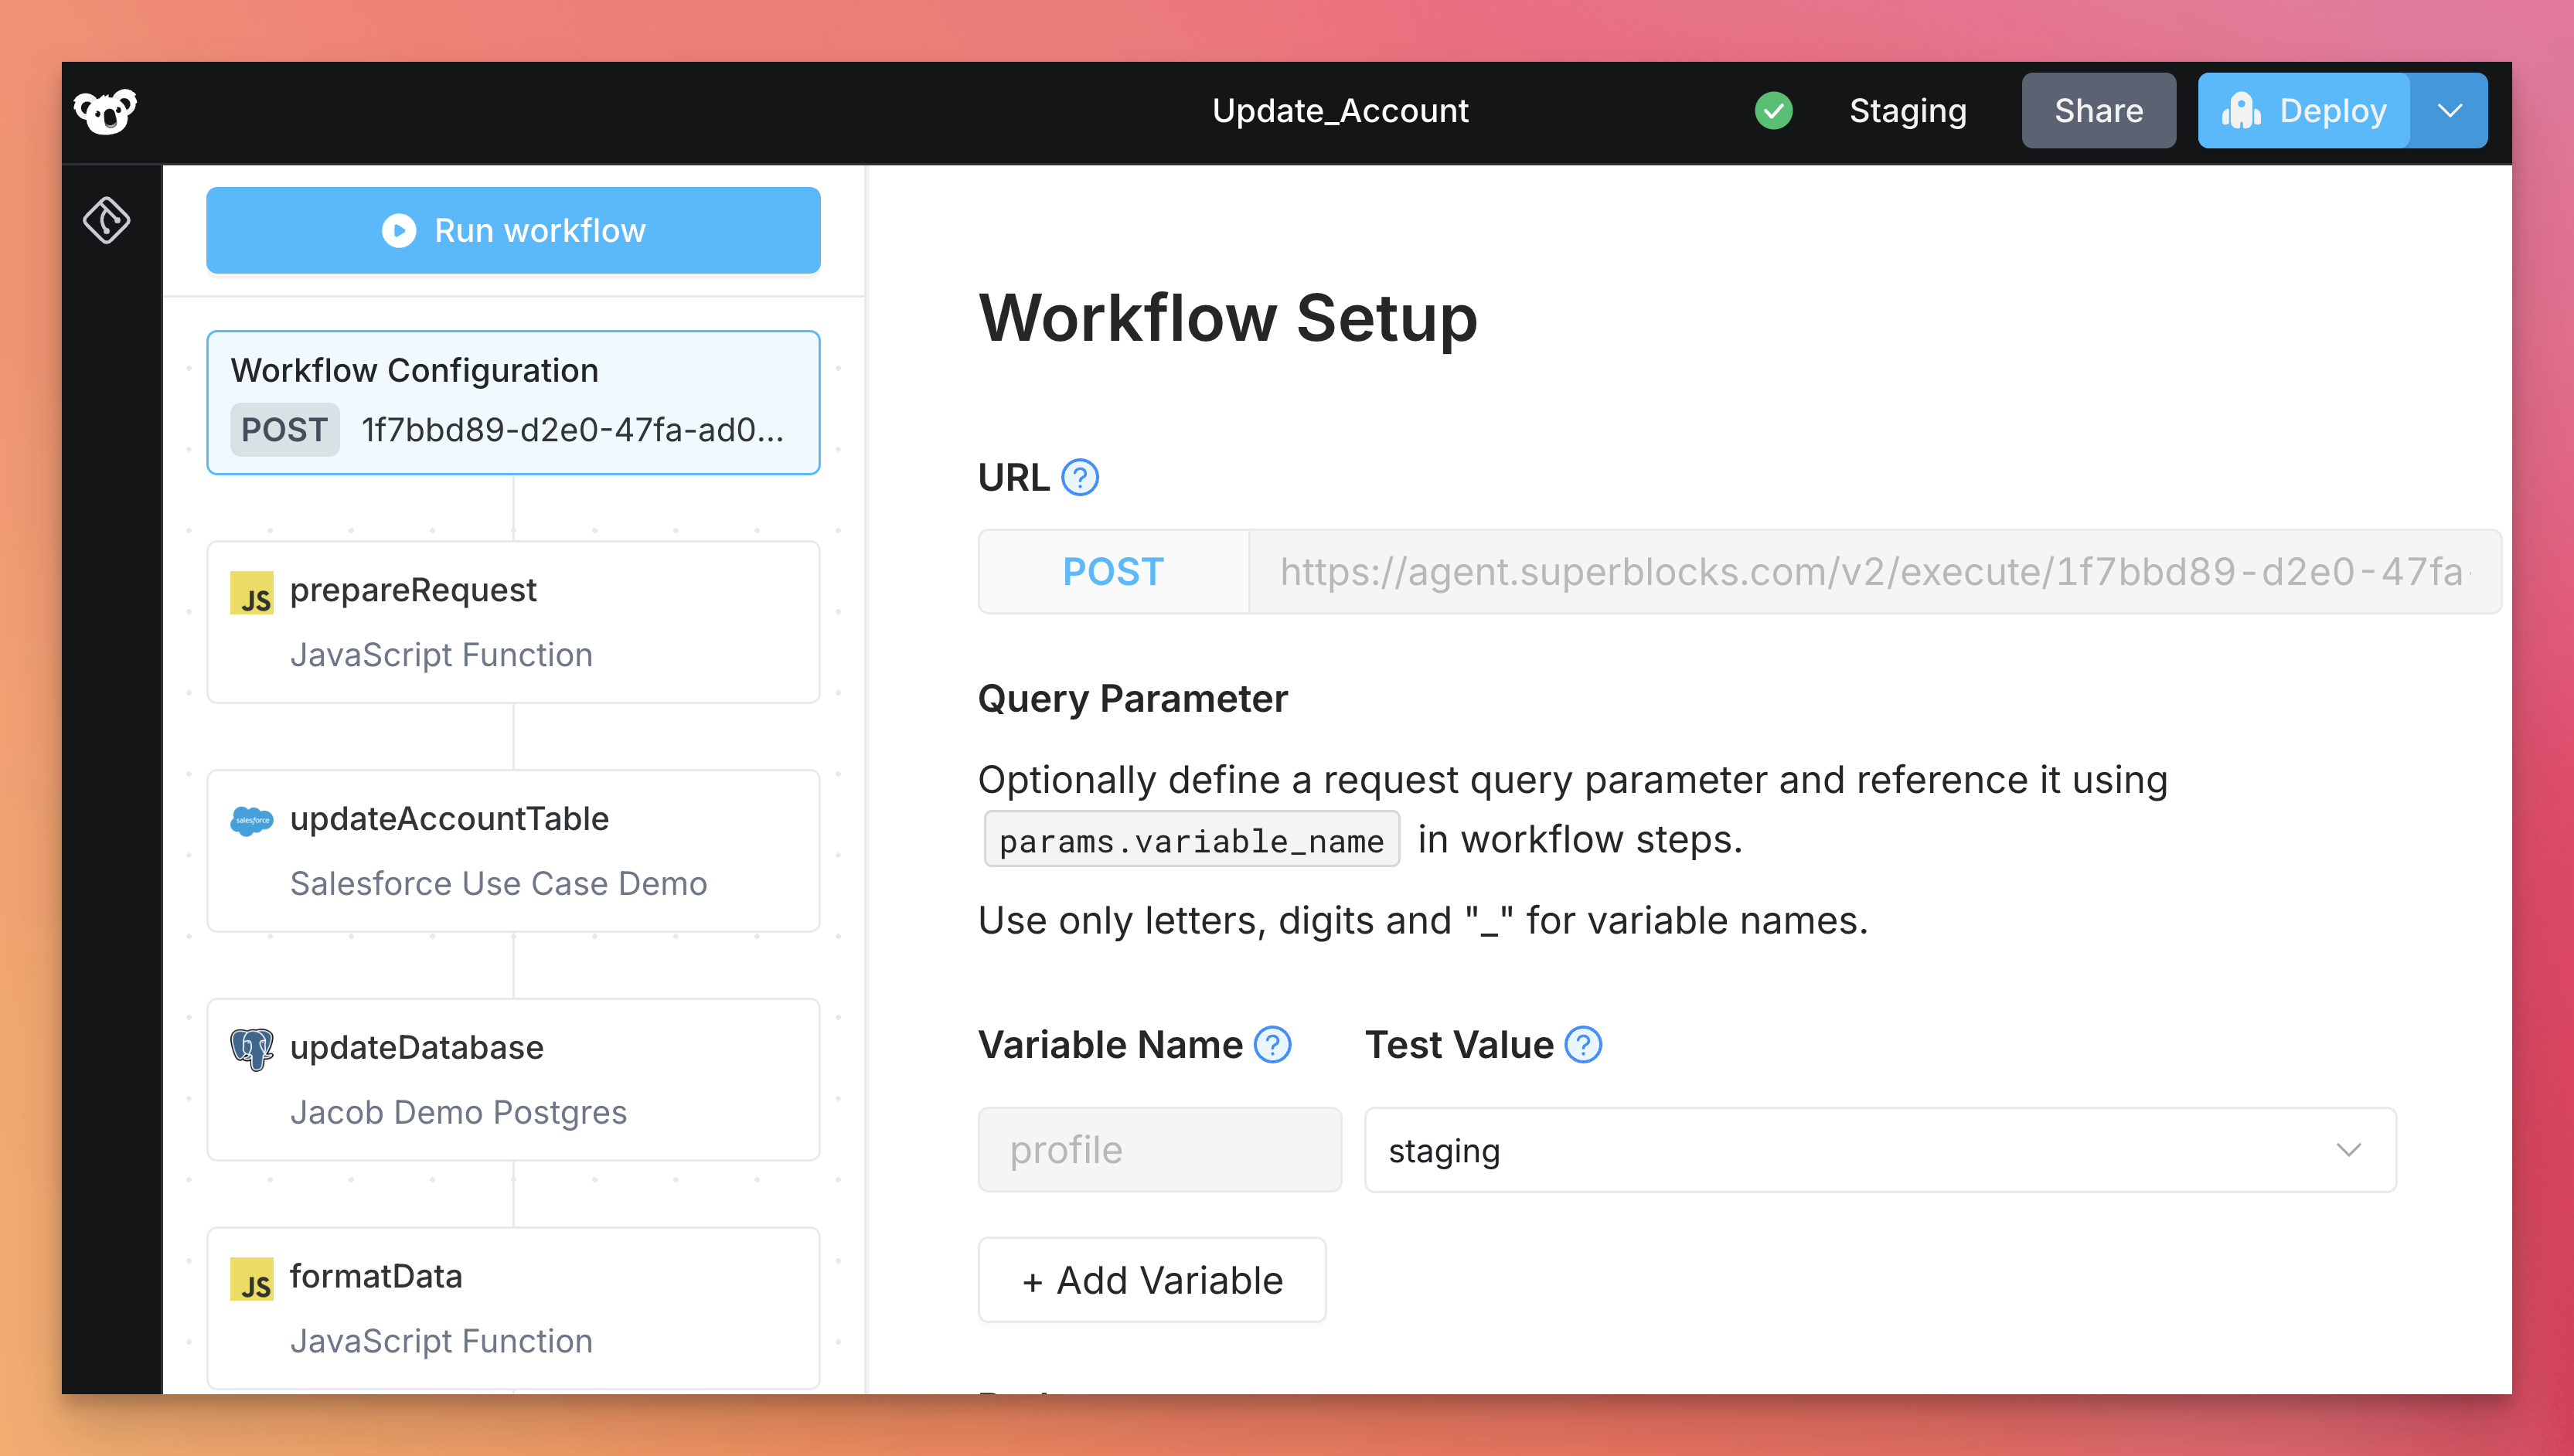
Any workflow created in Superblocks can be considered a tool, or function, that can be provided to Claude to act on external systems. We don’t need to spin up a separate standalone service to execute the tool, making it simple to add tools to Claude’s tool belt.
Step 3: Build the application that our sales team will use to interact with our AI Agent
Let's create an application that will house our API call Claude, as well as the chat interface for interacting with our AI Agent.
The first step will be to define our tool in a backend API using language that Claude can understand.
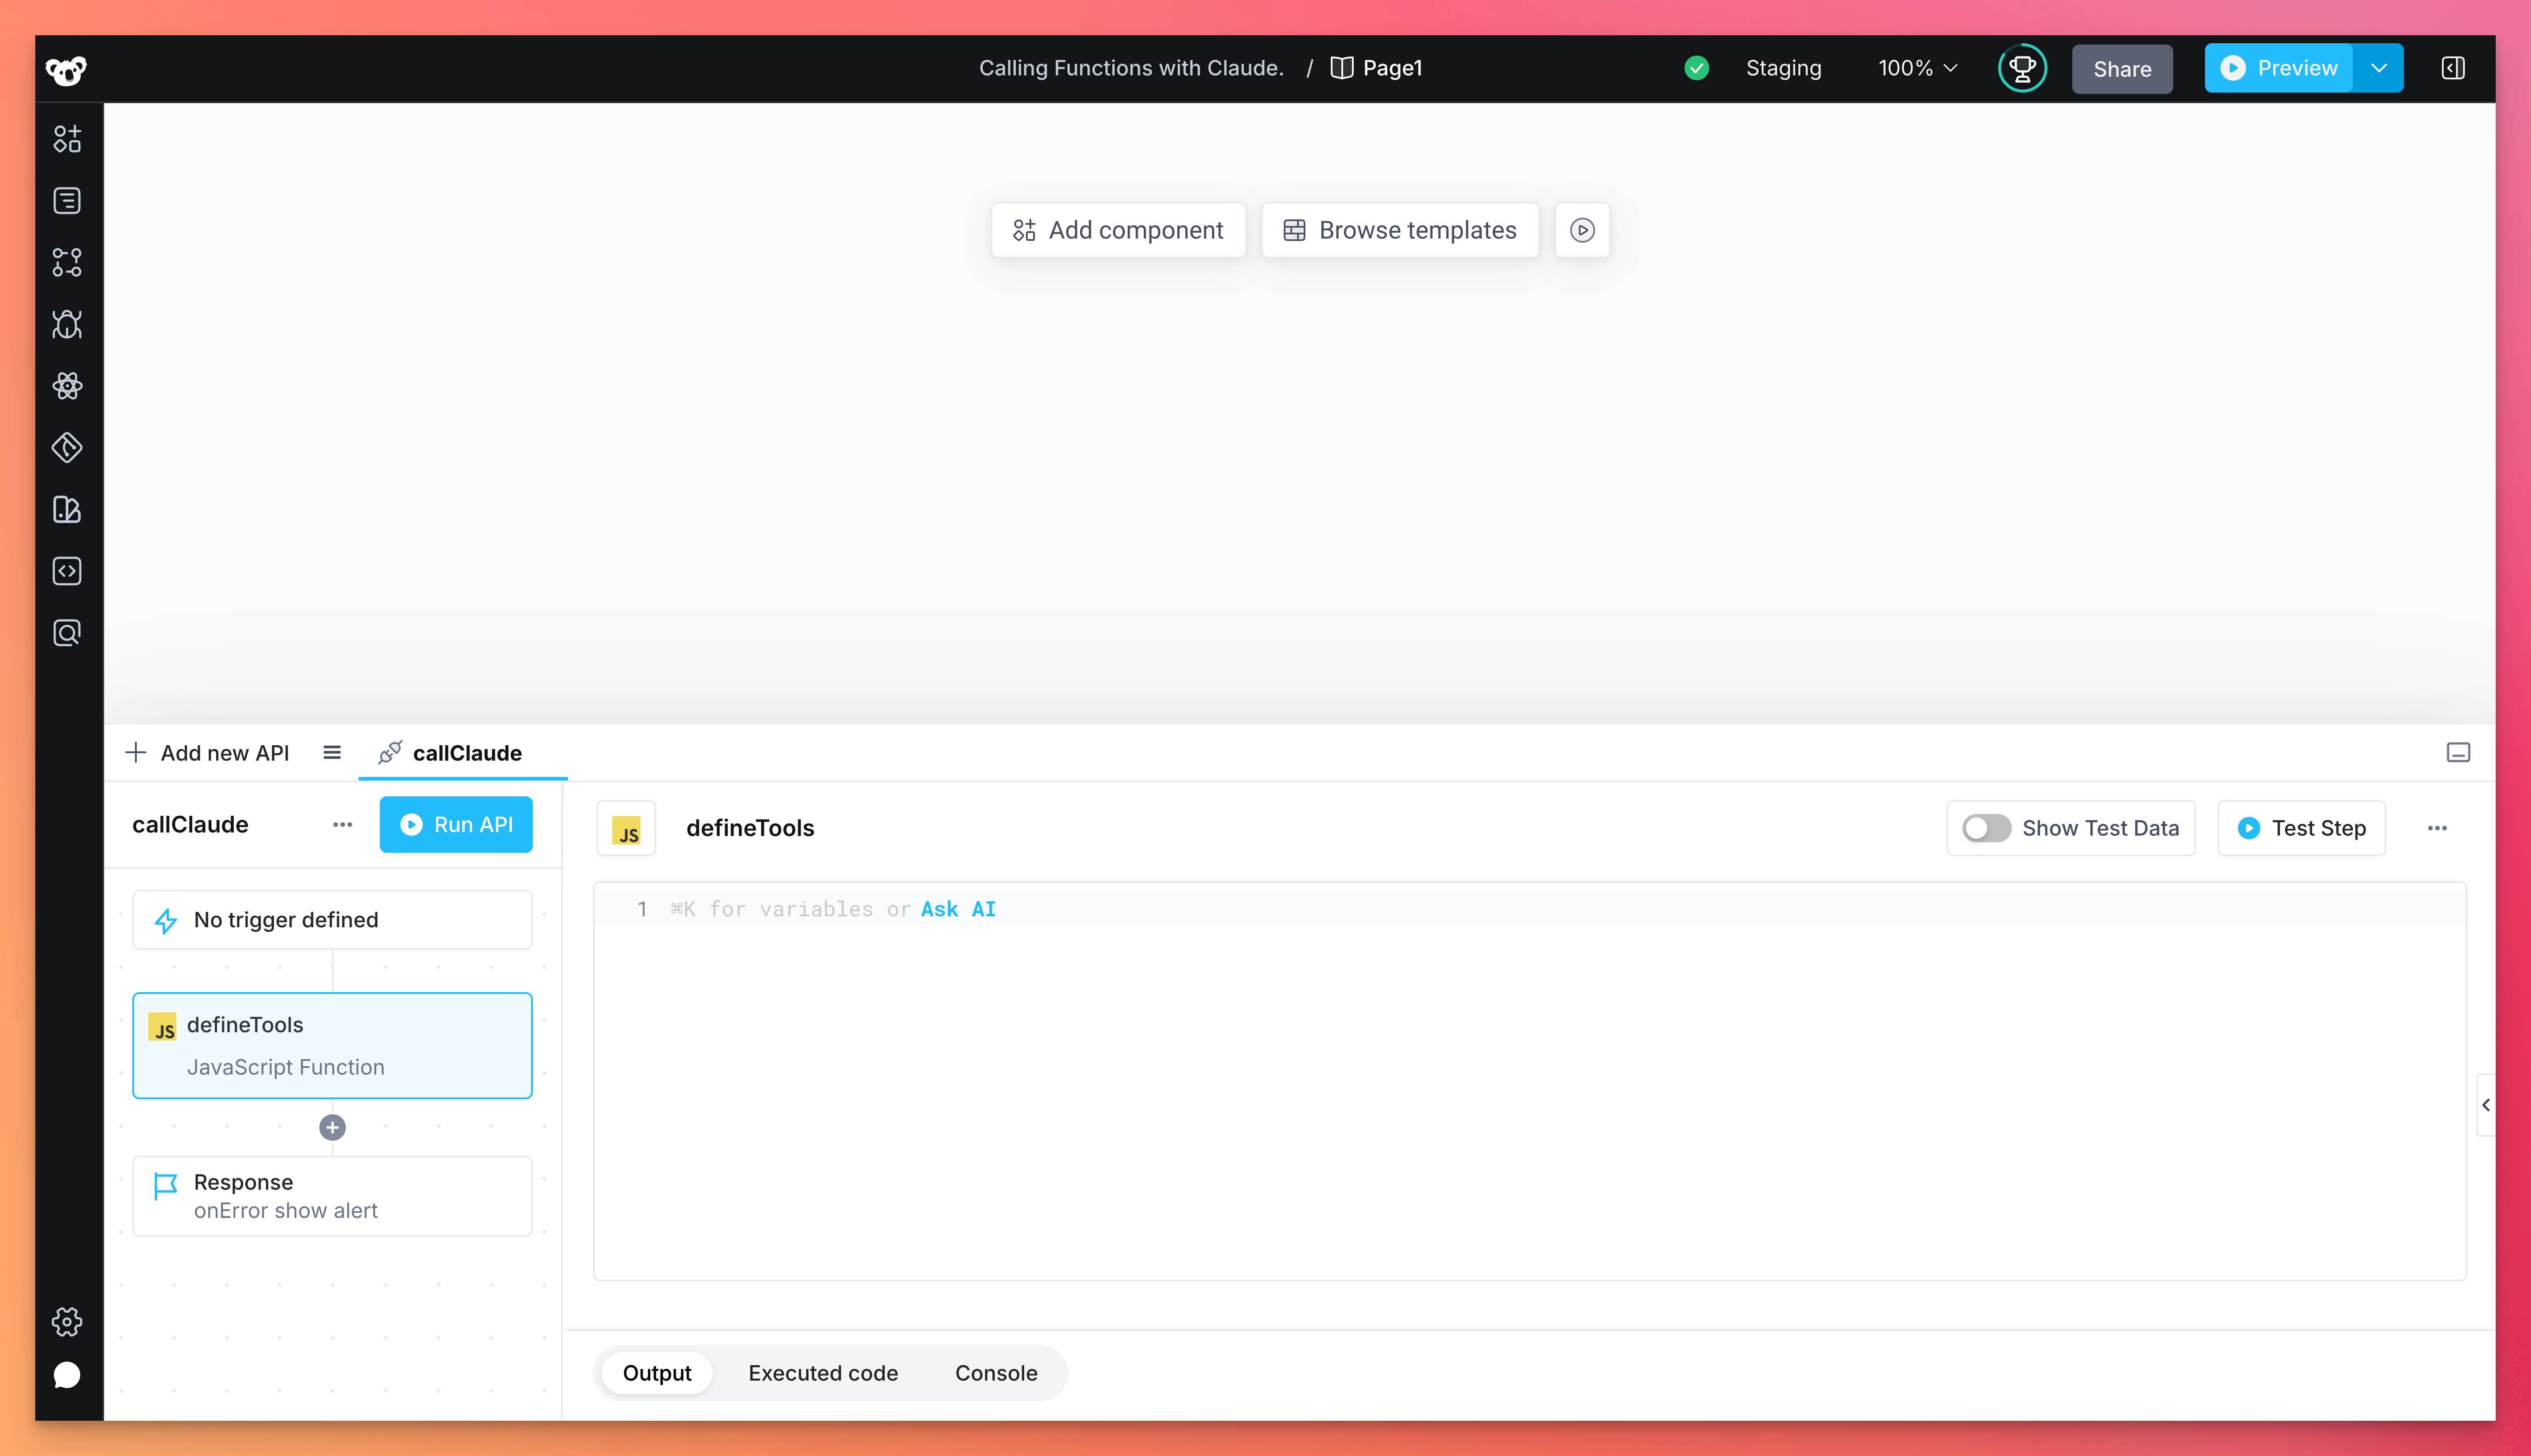
Step 3.1 - Defining tools to provide to Claude in our app API
To give Claude appropriate context of our tool, we will first begin by attaching a name and description of our tool. You can do this easily in Superblocks using Javascript. In my case, I am using a workflow that updates account info in Salesforce, and updates our database that we use for analytics accordingly as well. In the JavaScript below, I'm creating an object called update_account, and adding a name and description field within the JSON.
const update_account = {
  name: "update_account",
  description: "Easily update key Salesforce account information",
};
Now, we need to explain to Claude the name of each input, its data type, and what to do with it. To do this, we build a JSON object that defines the available inputs in the workflow, the options that Claude can use for each input, and which inputs must be provided in order to use the workflow. Here is the input schema that corresponds to the tool we created in the updateAccounts workflow:
input_schema: {
    type: "object",
    properties: {
      account_name: {
        type: "string",
        description: "Name of the account to update"
      },
      account_health: {
        type: "string",
        enum: ["Green", "Yellow", "Red"],
        description: "Current health status of the account"
      },
      primary_contact: {
        type: "string",
        description: "Name of the primary contact for the account"
      },
      customer_segment: {
        type: "string",
        enum: ["Enterprise", "Mid-Market", "Small Business", "Strategic"],
        description: "Customer segment classification"
      }
    },
    required: ["account_name"]
  }
By understanding each property and what it does, Claude can use reasoning to decide which property to update, and which input options are available to send back to the tool. Once we have this, we can put it all together and return the update_account object, and the tool is ready to provide to Claude.
const updateAccount = {name: "update_account",
  description: "Easily update key Salesforce account information",
  input_schema: {
    type: "object",
    properties: {
      account_name: {
        type: "string",
        description: "Name of the account to update"
      },
      account_health: {
        type: "string",
        enum: ["Green", "Yellow", "Red"],
        description: "Current health status of the account"
      },
      primary_contact: {
        type: "string",
        description: "Name of the primary contact for the account"
      },
      customer_segment: {
        type: "string",
        enum: ["Enterprise", "Mid-Market", "Small Business", "Strategic"],
        description: "Customer segment classification"
      }
    },
    required: ["account_name"]
  }
}};

return [update_account]
To put it all together in the app, we just need to add a JavaScript step to our API that passes off the definitions to Claude.
Step 3.2: Call Claude
In the same API, we'll want to add another step that builds the request to Claude containing the user's prompt that we'll send to Claude for processing. The JavaScript below is an example of passing the above tool to Claude, and creating the full request that will be sent to the Claude API.
return {
  model: "claude-3-haiku-20240307",
  messages: [
    {
      role: "user",
      content: “Update Superblocks to green”,
    },
  ],
  max_tokens: 500,
  tools: defineTools.output,
};
For now, the content field is static. We will use this in order to analyze the response of this prompt, and will later connect this to a chat interface.
Once the Javascript step is complete, we can pass this to Claude using an Anthropic step. Choose the "POST - Create a Message" option in the Action dropdown and set the JSON Body to {{prepareRequestBody.output}}.
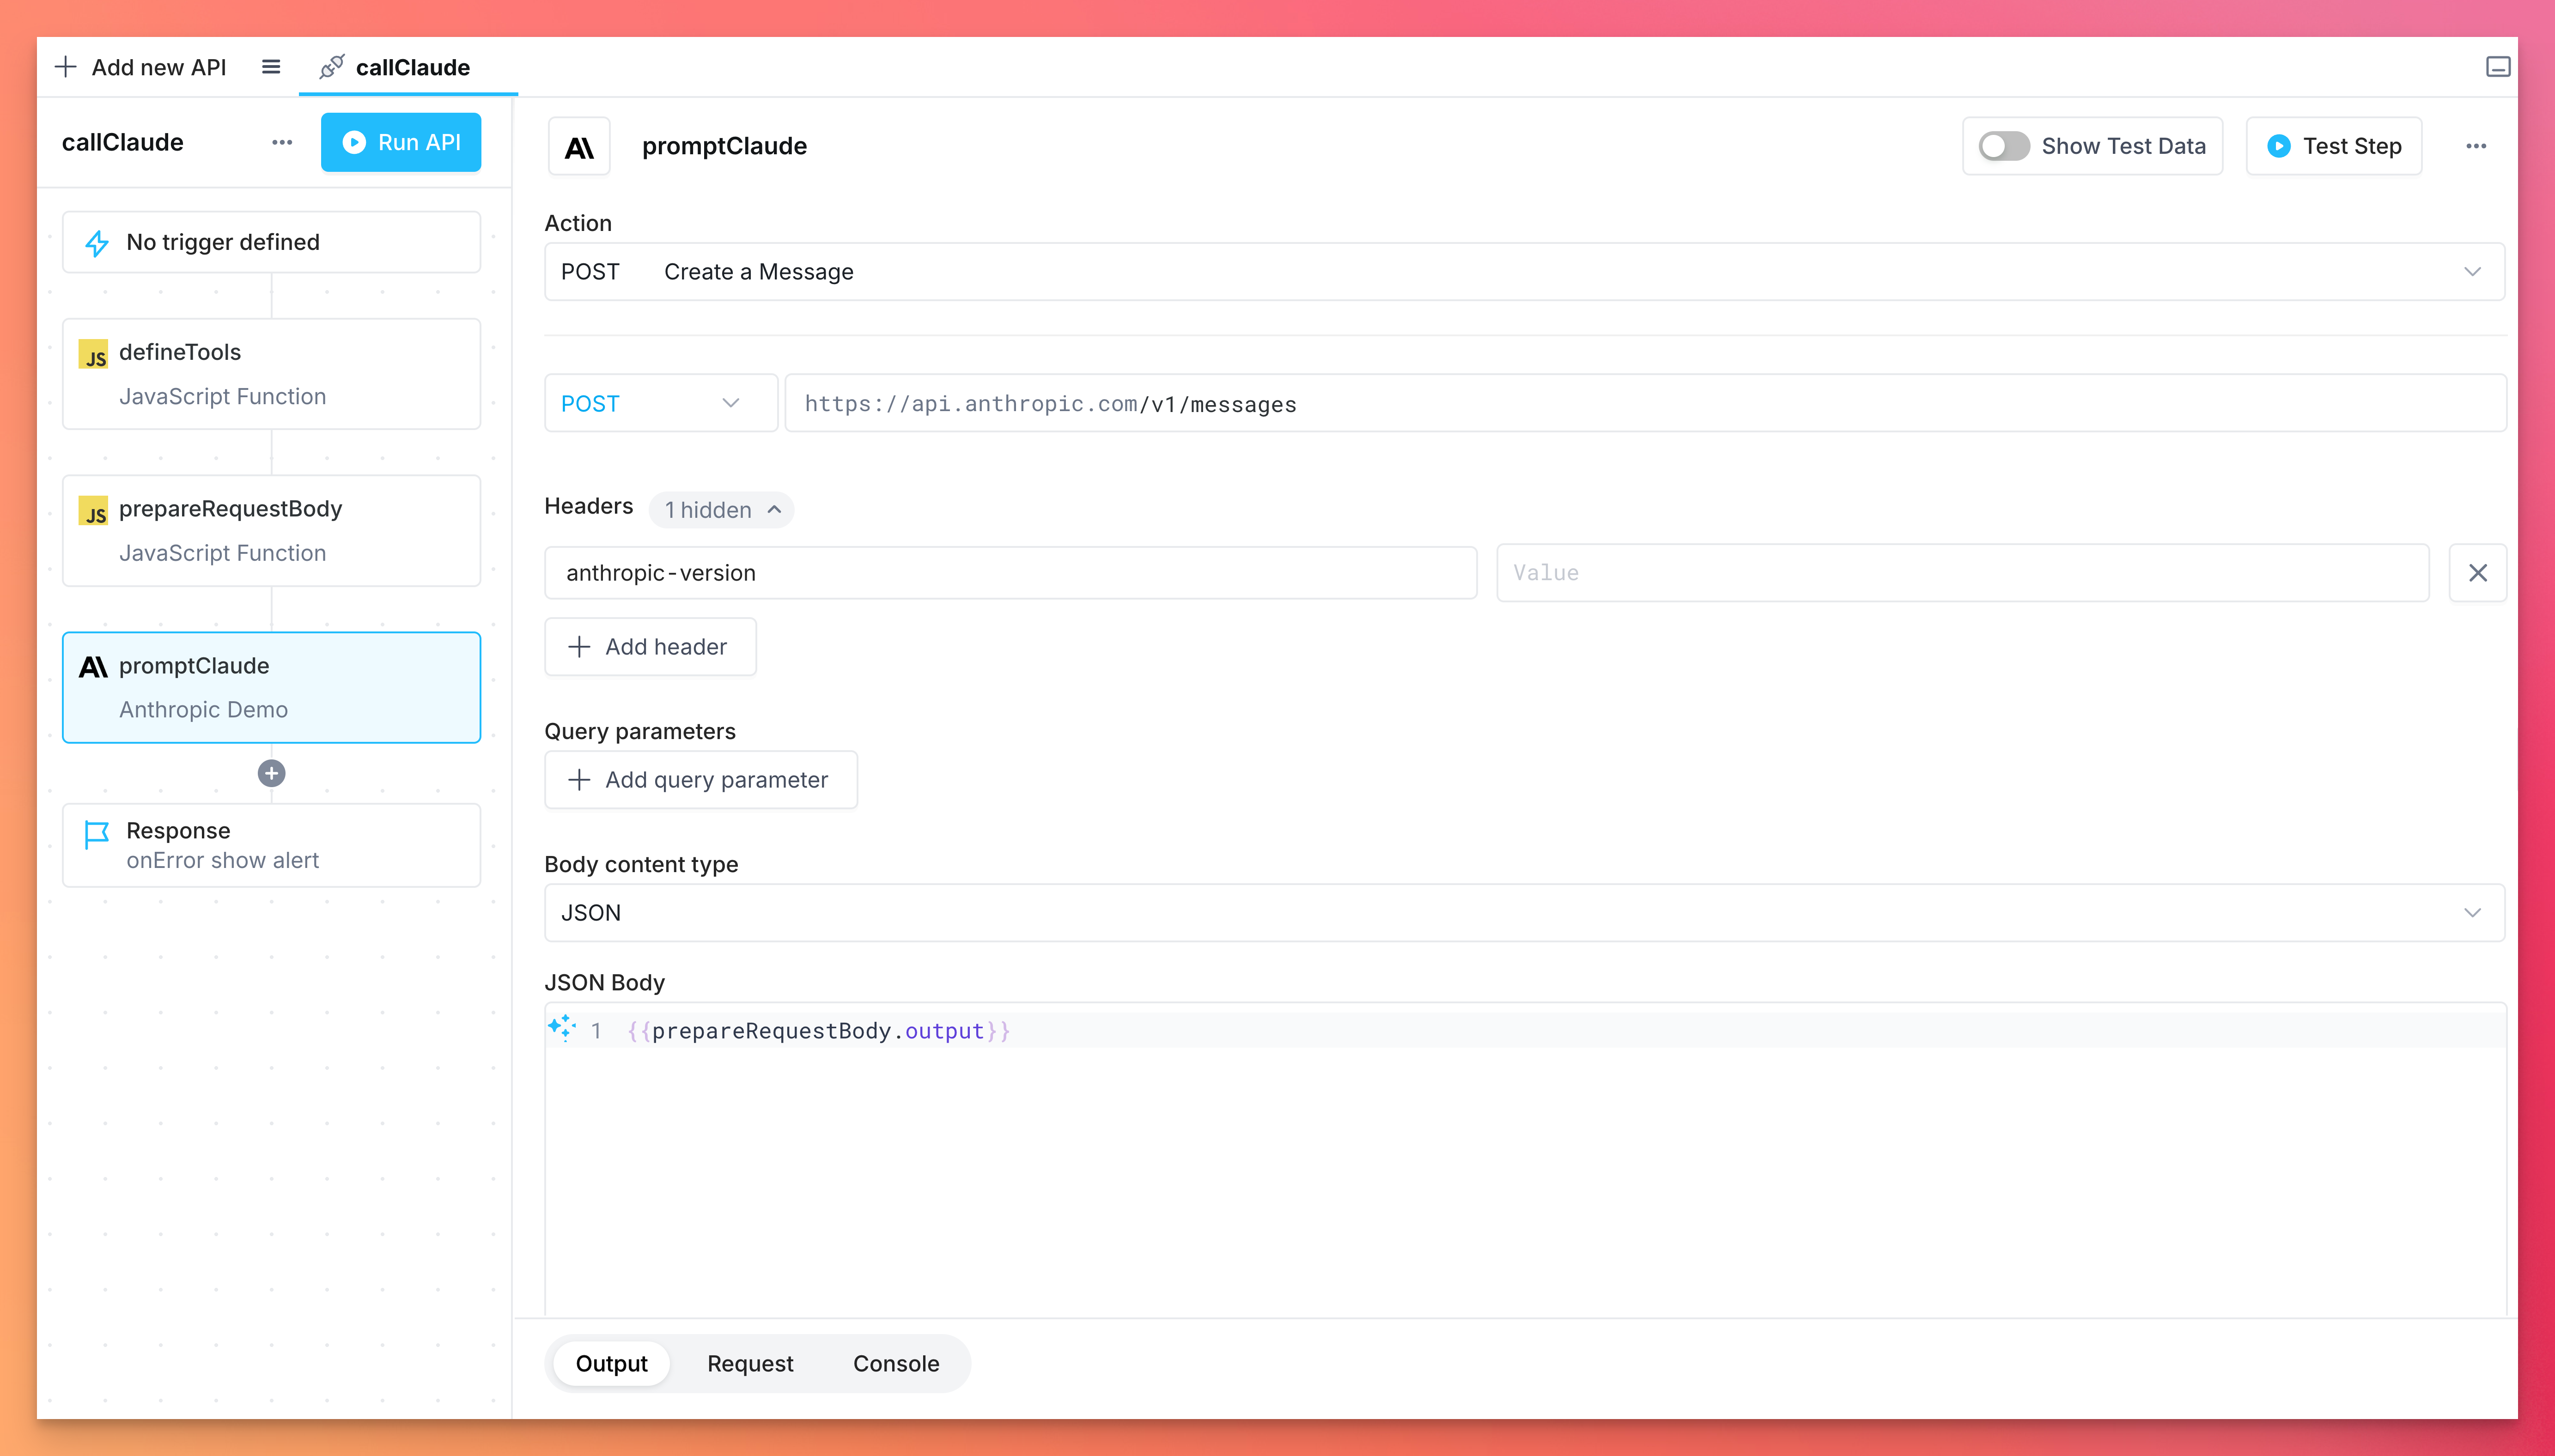
We are now ready to run the API in order to take a look at the response. After running the API, I get the following output:
{
  "content": [
    {
      "text": "Okay, let's update the Superblocks account information:",
      "type": "text"
    },
    {
      "id": "toolu_019cUDZakEKraXAJwcSmyQPu",
      "input": {
        "account_health": "Green",
        "account_name": "Superblocks"
      },
      "name": "update_account",
      "type": "tool_use"
    }
  ],
  "id": "msg_01WiYfXayQii6oECF3zo4sjx",
  "model": "claude-3-haiku-20240307",
  "role": "assistant",
  "stop_reason": "tool_use",
  "stop_sequence": null,
  "type": "message",
  "usage": {
    "input_tokens": 448,
    "output_tokens": 92
  }
}
Let’s break this down. Within the content object in the response, there are two entries - a text entry and an entry containing the inputs for the tool we defined, along with the name of the tool that Claude wants to use. Additionally, there is a stop_reason entry in the response with the value tool_use. This can be used to let us know that Claude wants to call a tool, and we can then route the response to our workflows.
If your agent will need to execute different workflows contextually, you can set up multiple tool configurations and use Superbocks’ conditional blocks to orchestrate which tool (and thus workflow) will be called. So far, we only have one tool defined, but I’ll add a conditional block to my API to lay the foundation for more tools to be added in the future. We can traverse the JSON response from Claude in order to create the conditions for each tool.

Finally, we can pass the inputs to our workflow by accessing the response from Claude:
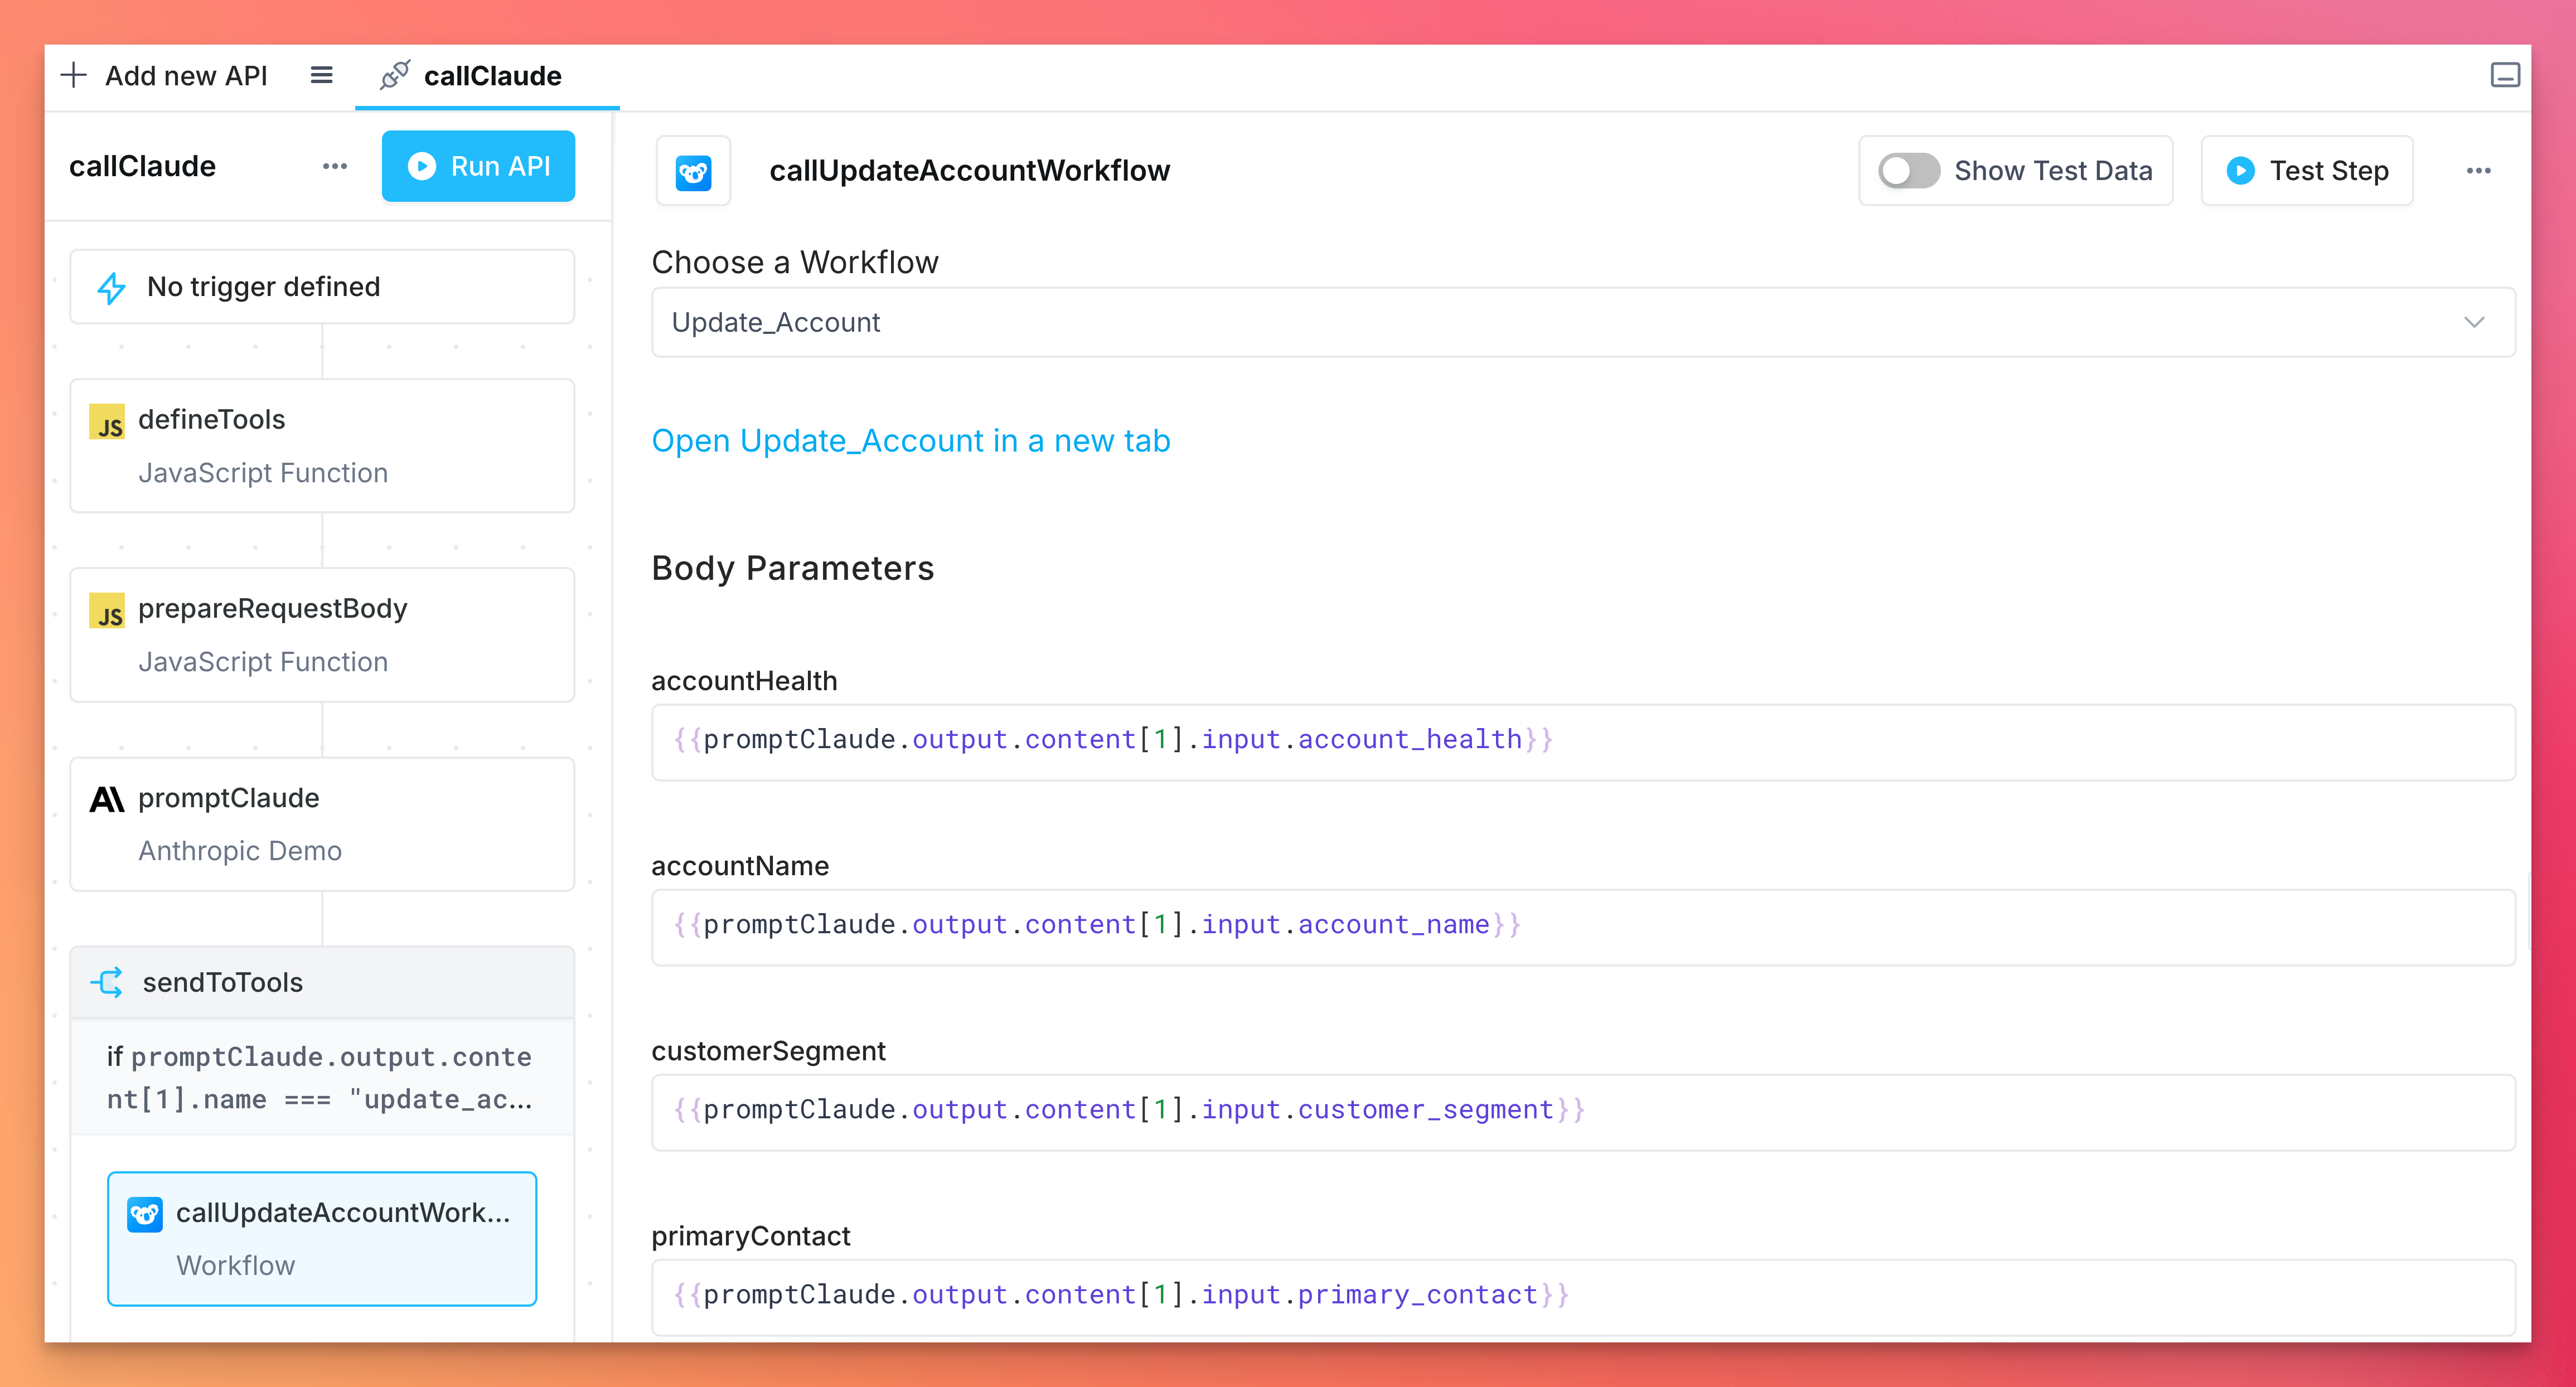
In some cases, the response of our tool will need to be sent back to Claude for processing. In other cases, it will be sufficient to process Claude’s request for a tool, and send a message back in the frontend.
In either case, we can utilize the Send control block in order to stream messages into our frontend. In this case, I will return the output of our workflow, however this Send block can also be dynamically generated from Claude.
Step 4: Building the chat interface
Once the API has been built, we can hook this up to a chat component on our frontend. The first step to hook this up is to create a frontend variable - this variable will be used to store the message history, and we will stream new responses from Claude into this variable. Here, I’ve named the variable messageHistory:
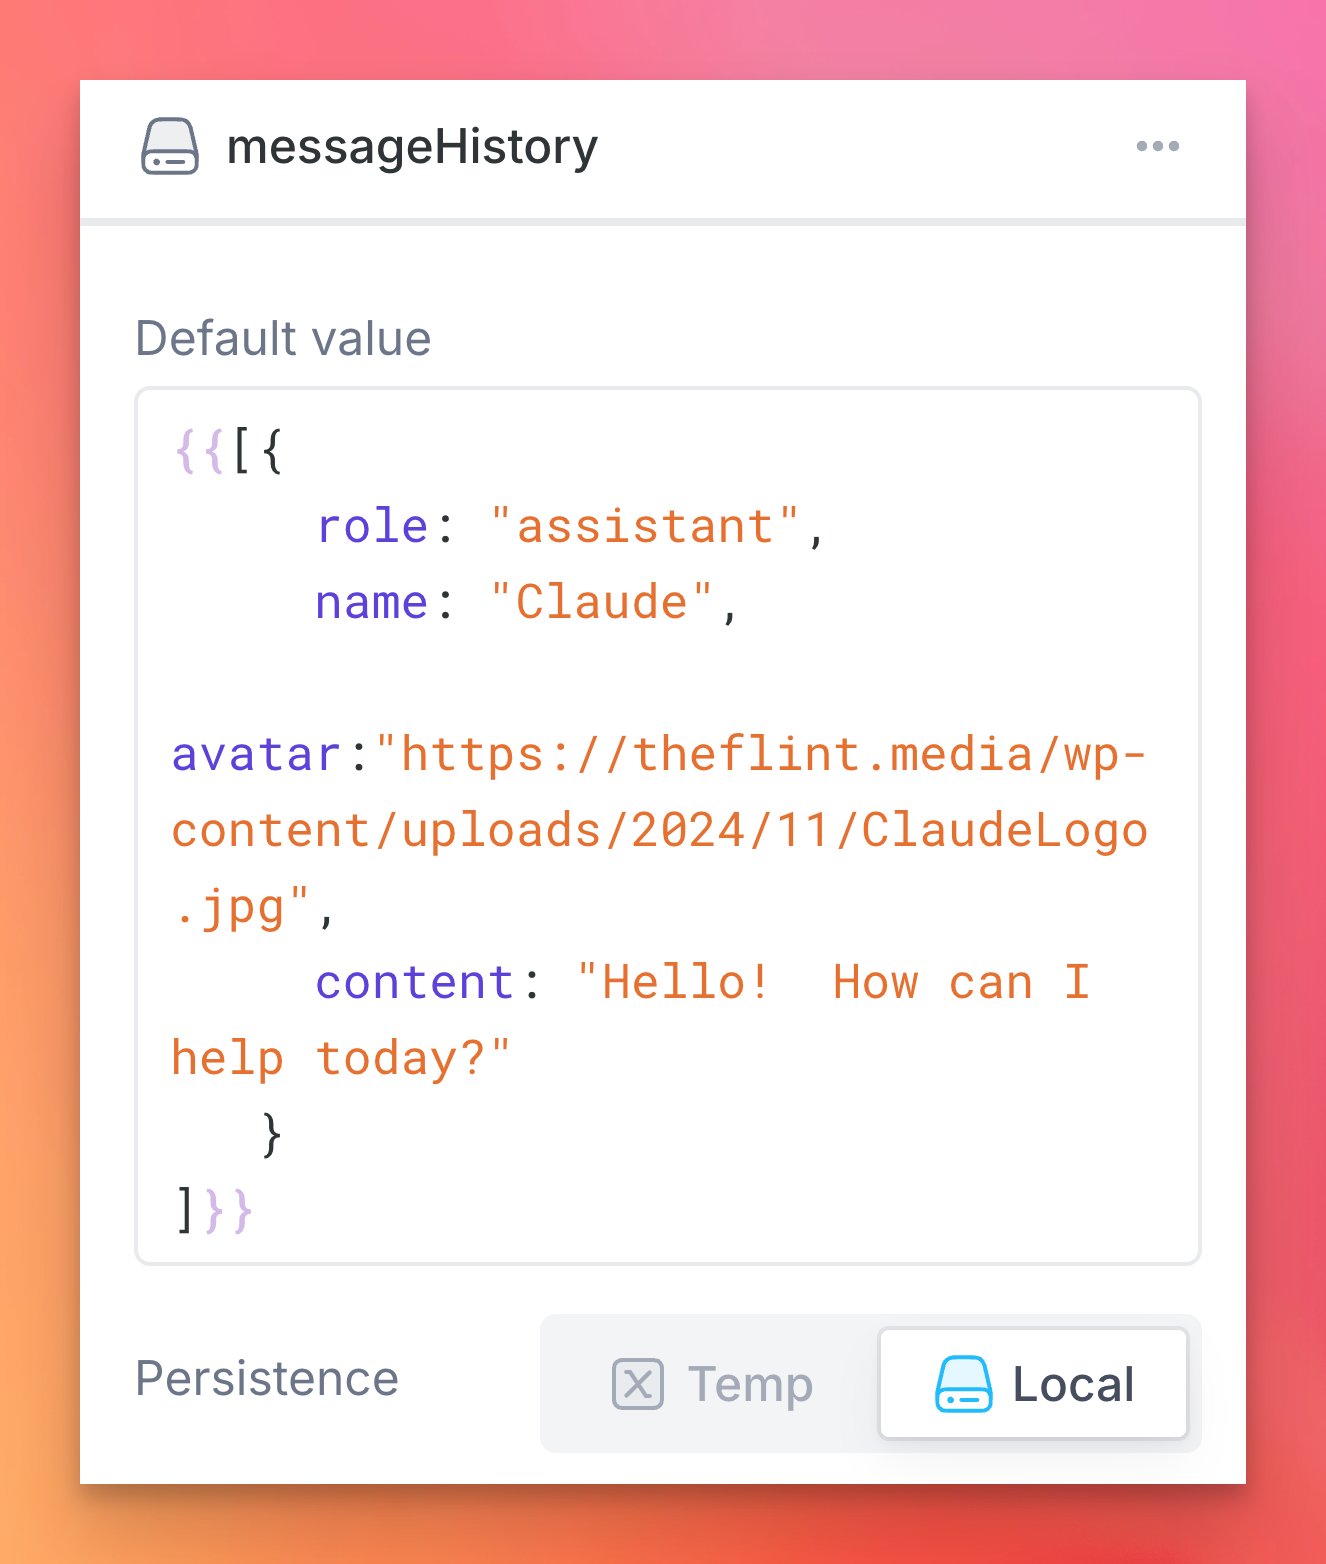
Superblocks gives the option to use two types of variables - temporary and local storage. By choosing local storage we are ensuring that the chat history will remain throughout the browser session. If you would like the chat to reset upon refresh, choose temporary.
Additionally, adding a default value ensures that there is an initial message in the component when users open your application. Here is the code that is used in the above screenshot:
{{[{
	role: "assistant",
	name: "Claude",
	avatar:"https://theflint.media/wp-content/uploads/2024/11/ClaudeLogo.jpg",
	content: "Hello!  How can I help today?"
}]}}
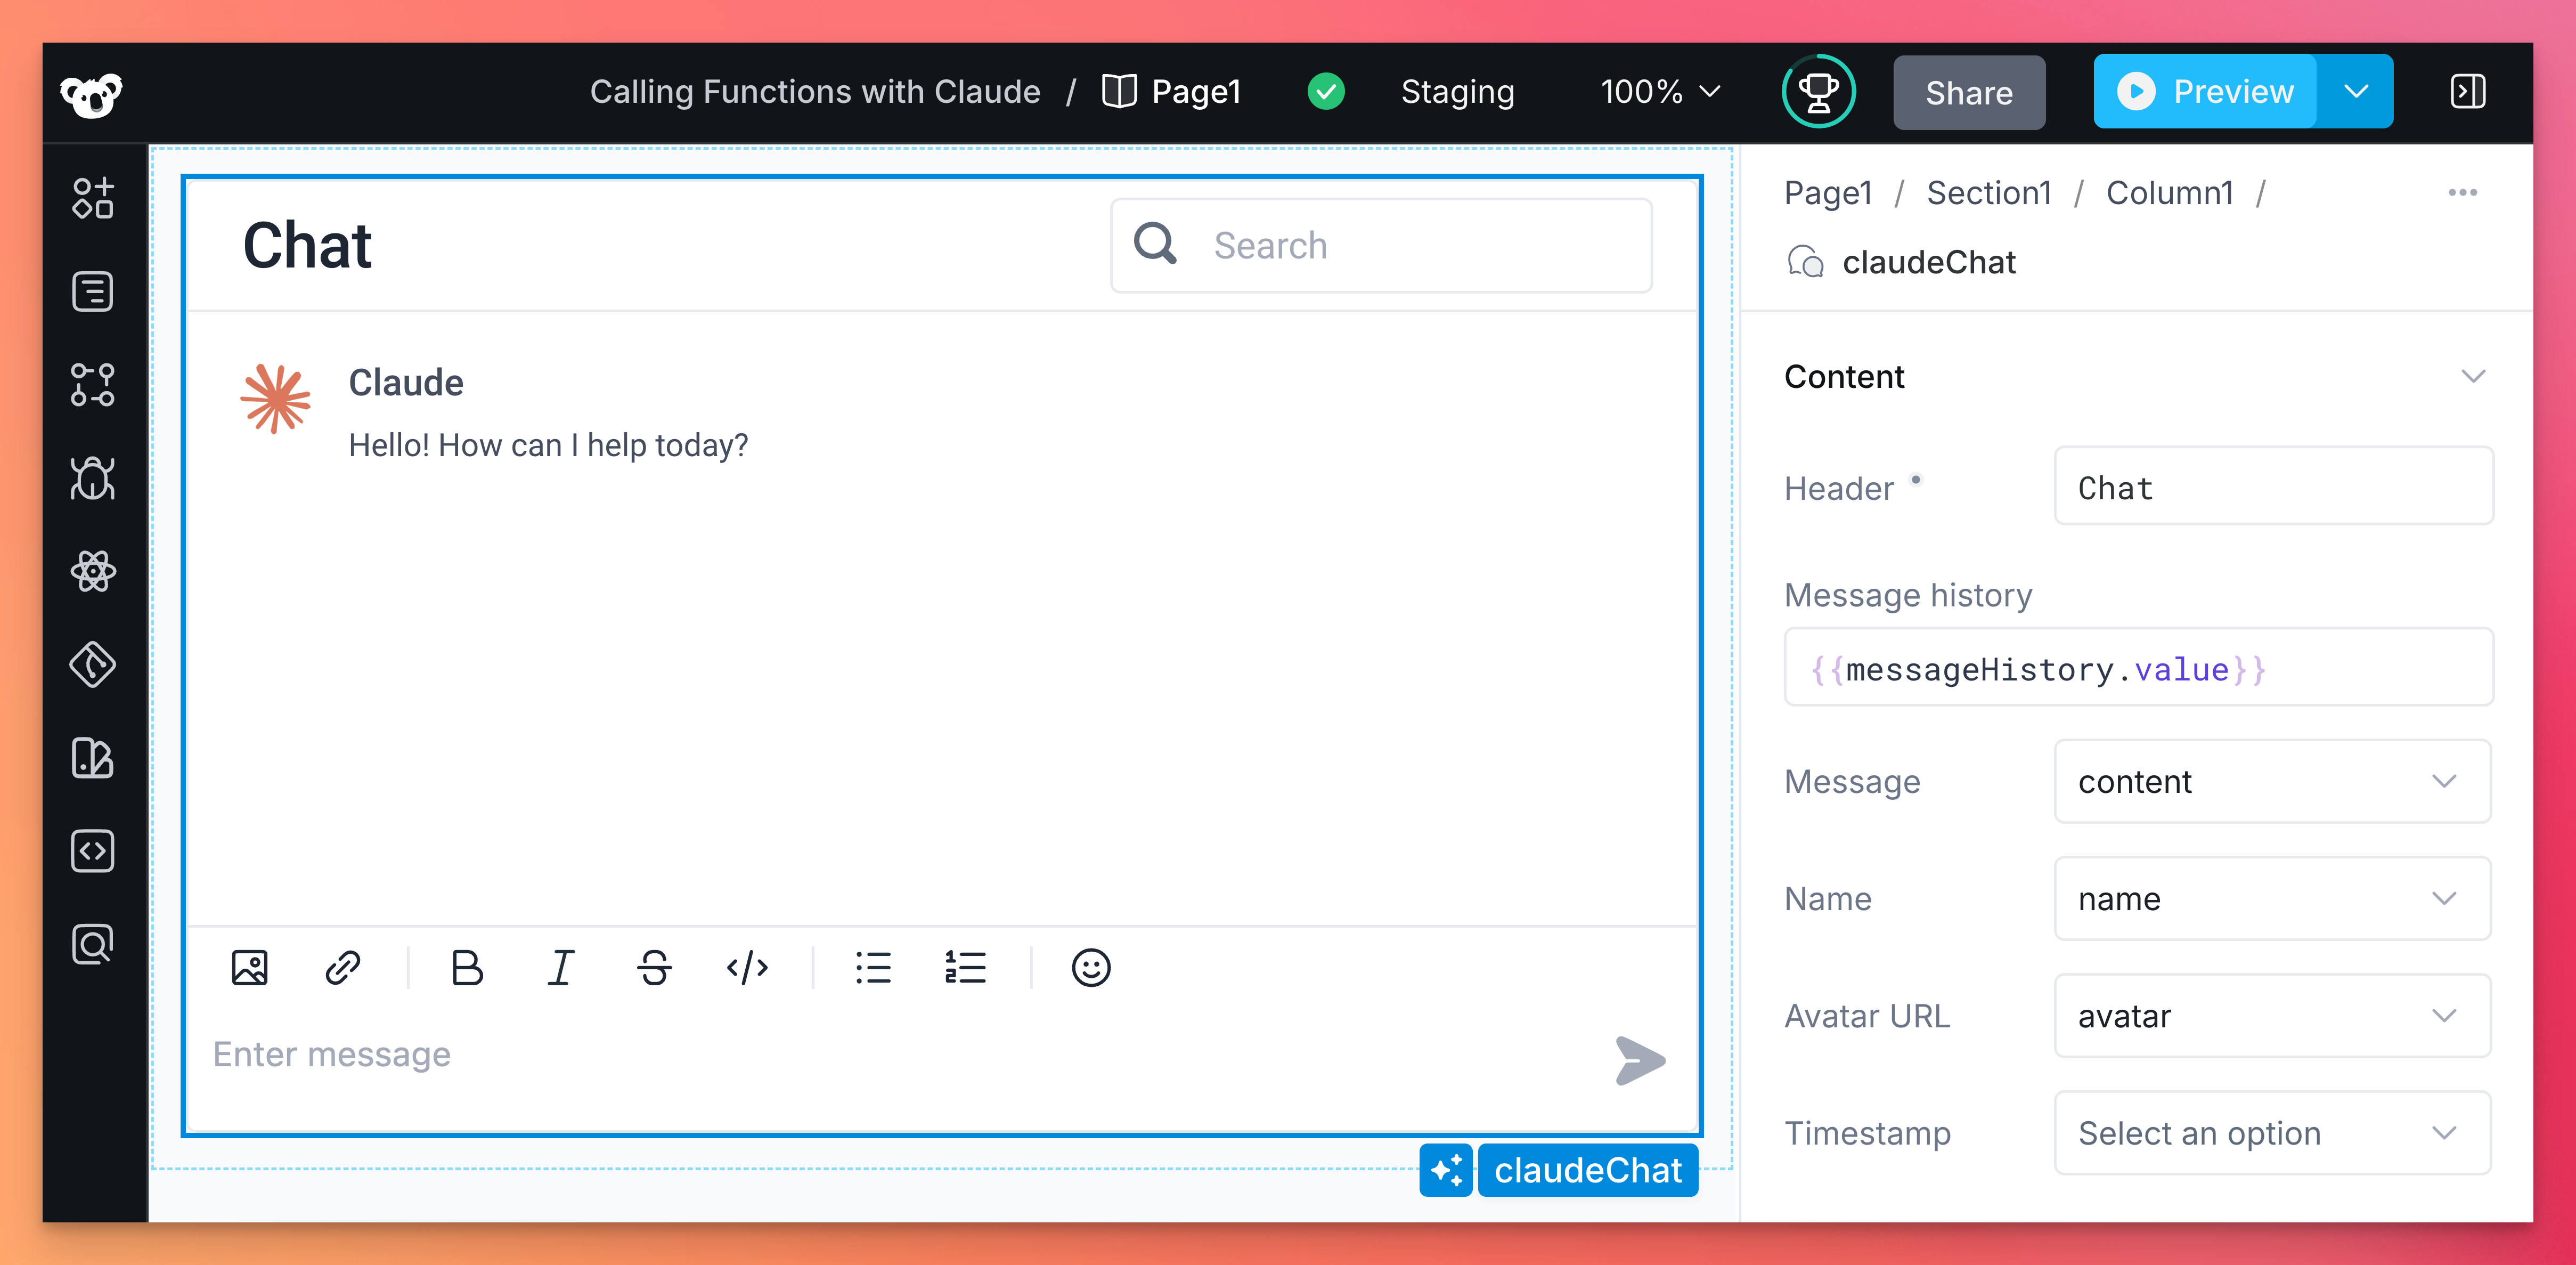
We can now add the chat to our frontend. Drag our native chat component (or add a custom chat component from your library or the web) to the application’s canvas and rename it to claudeChat. In the Message history field in the properties panel, set the value to the our frontend variable - {{messageHistory.value}}.
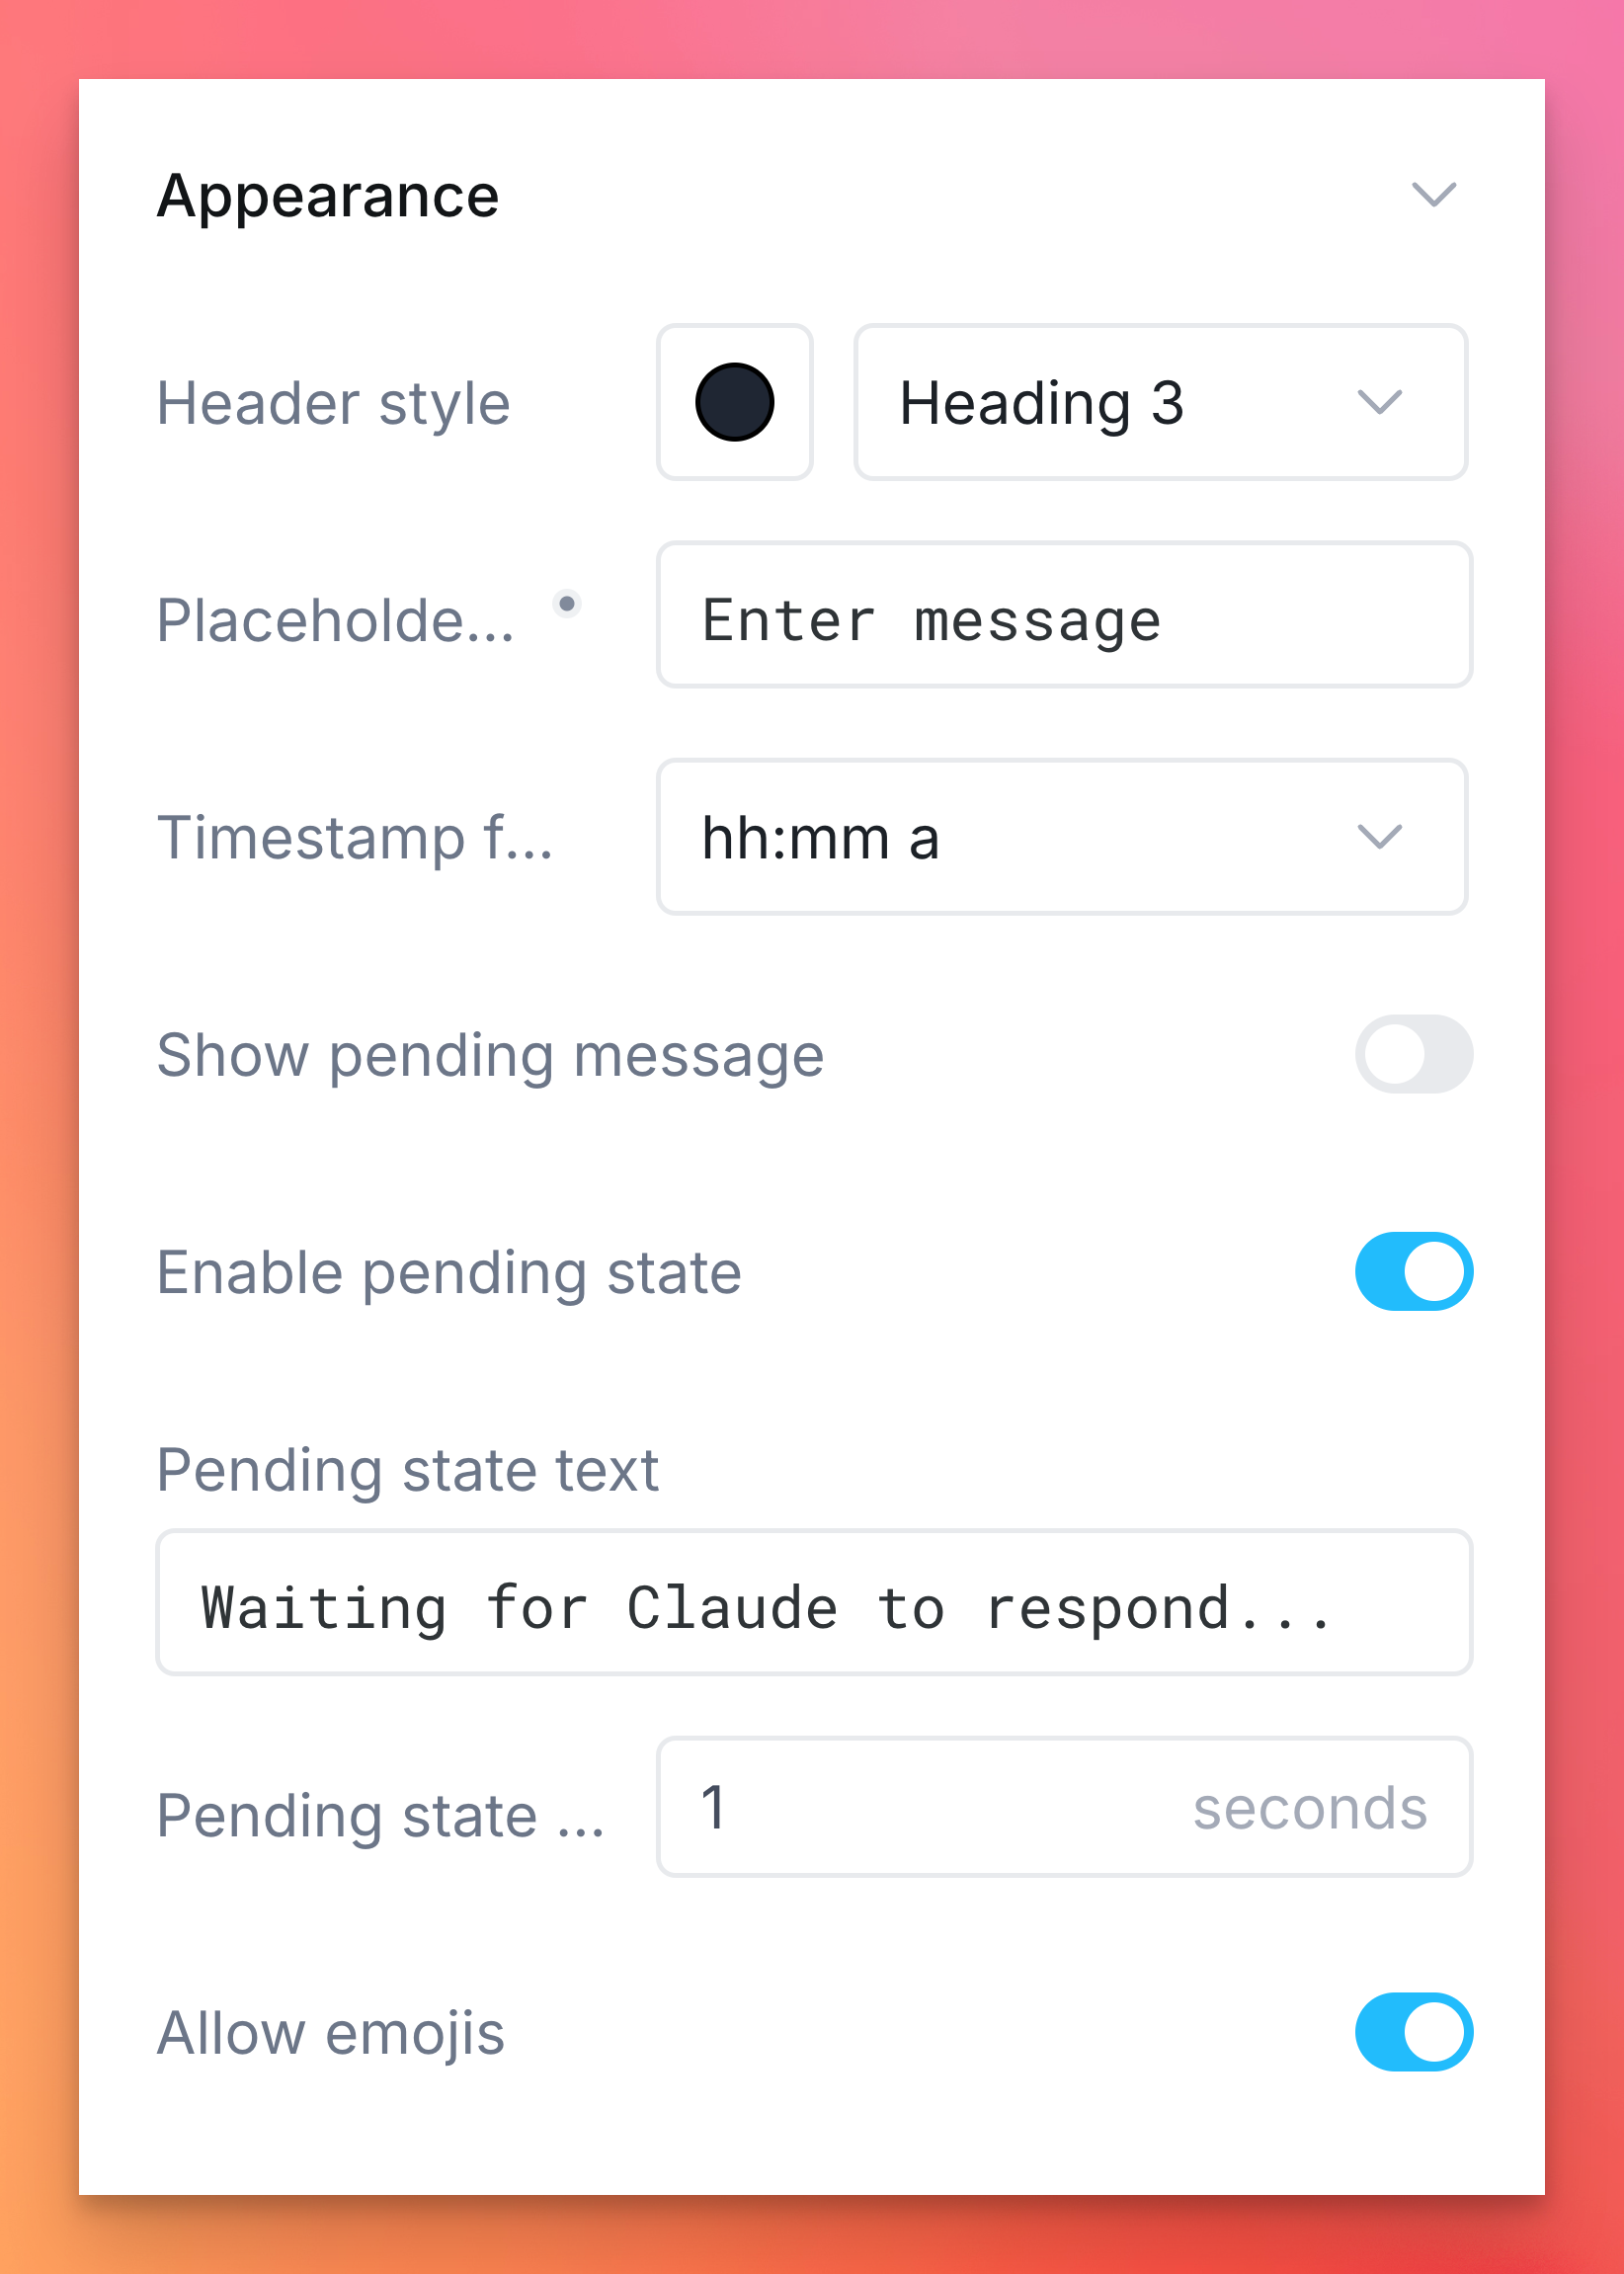
We can also configure the message that displays while the API is running - in the Appearance section of the property panel, disable the Show pending message option - we will configure the pending message using our frontend variable in order to show the message sent by the end user of the application. Additionally, you have the option to set a pending state text, and configure the amount of time before that message appears:
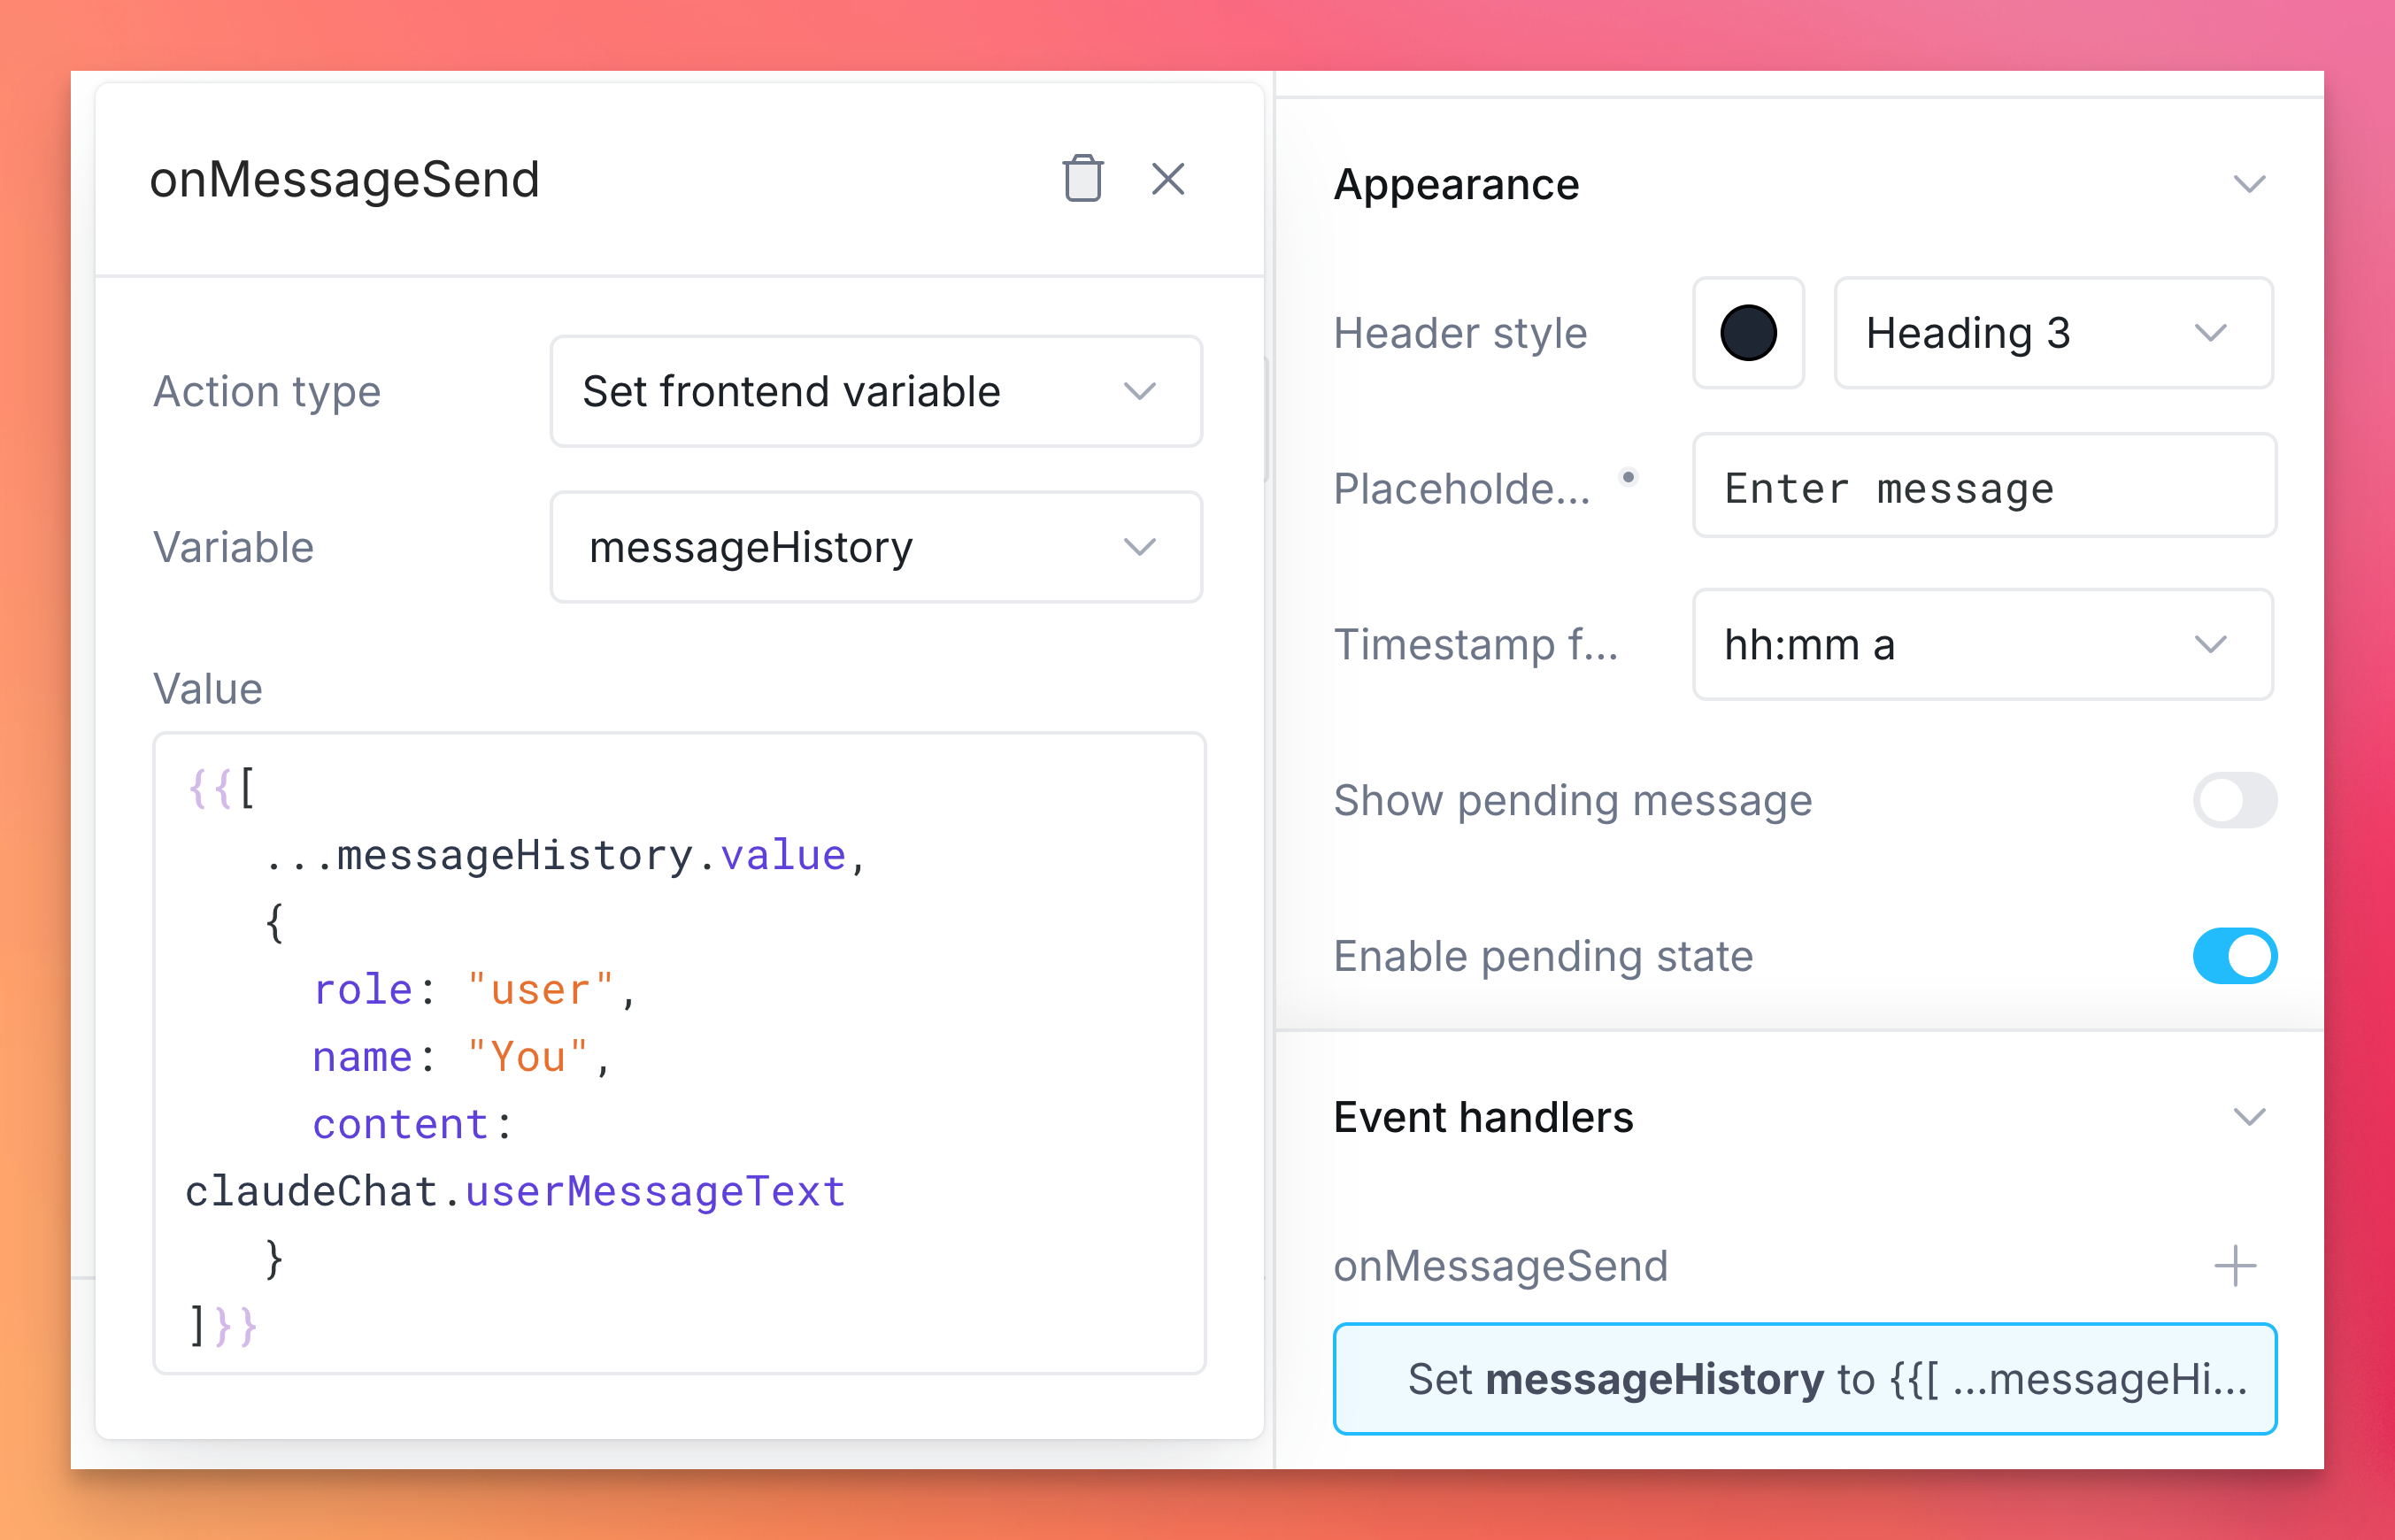
From the properties panel for the Chat component, we can set event handlers for the chat component when new messages are sent. We first want to update the messageHistory frontend variable using a Set frontend variable event. We can use the following code to update our frontend variable:
{{[
   ...messageHistory.value,
   {
	   role: "user",
	   name: "You",
	   content: claudeChat.userMessageText
   }
]}}
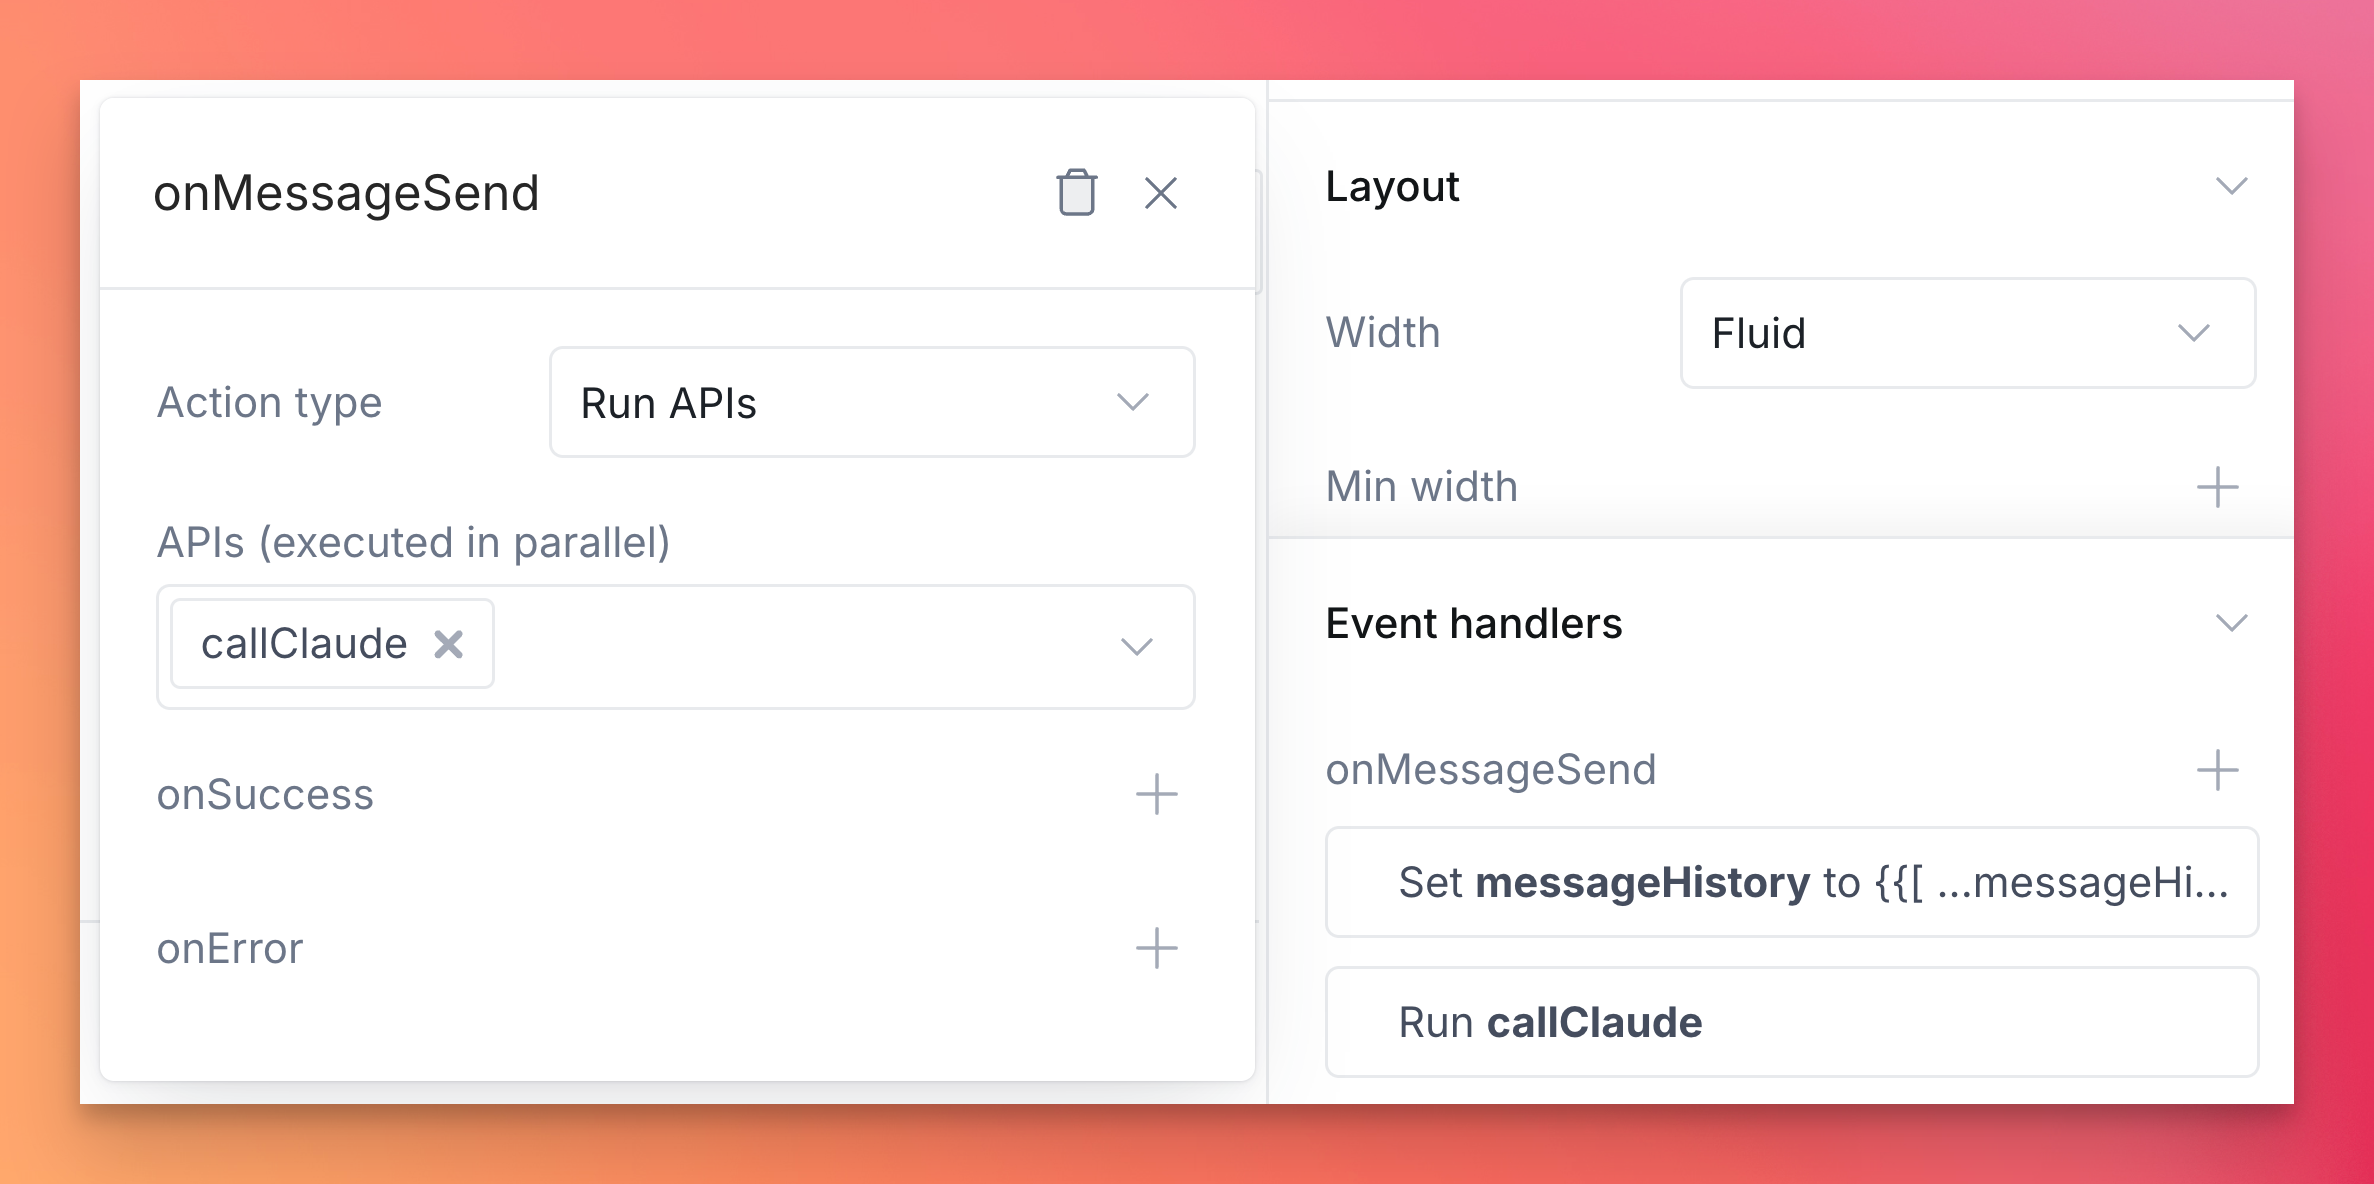
After we set the messageHistory variable, add another event handler to run the callClaude API:
We can now go back to the API we built originally and connect the content field of the request we send to Claude to our chat component. This can be done simply by updating the content field to claudeChat.userMessageText.
Additionally, we can structure the response of the API to stream into the frontend - this will create a seamless experience for the end user when interacting with the chat component. Instead of waiting for the full response of the API before updating the chat interface, streaming the response will update the frontend in real time as the responses are generated from Claude. In the response section of the API, set the Response type to Streaming:
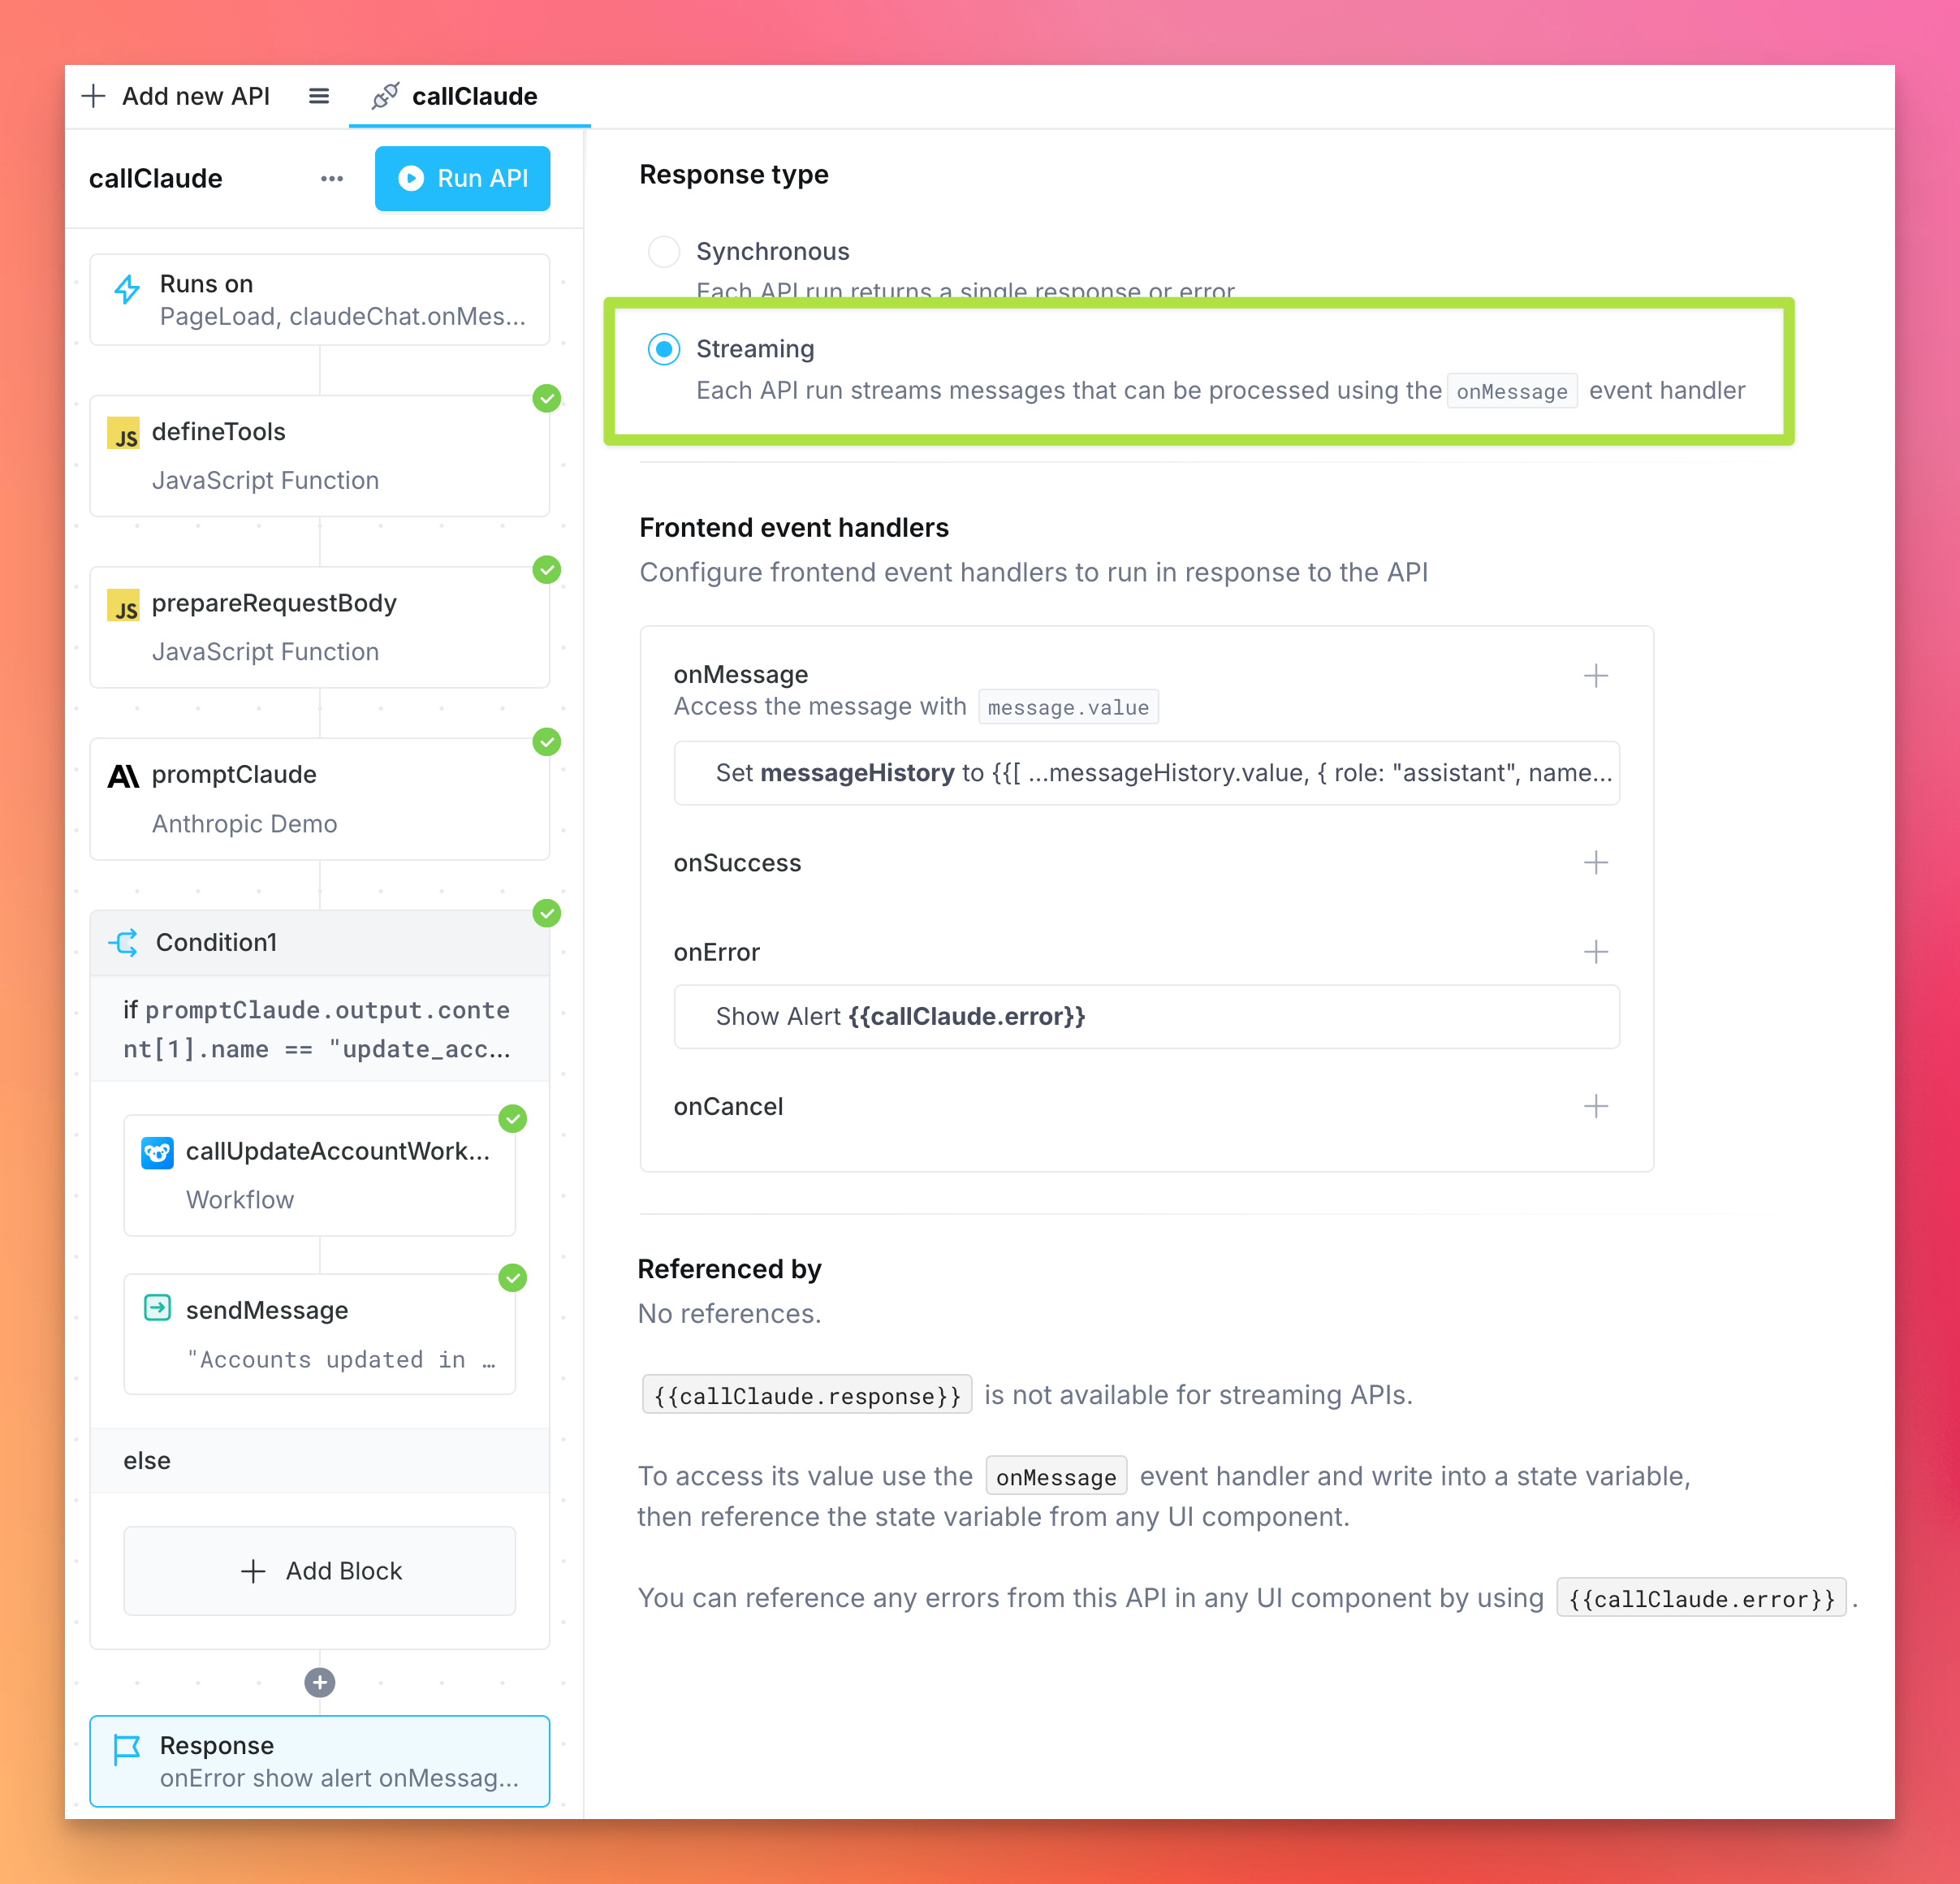
The last few edits to make will update the frontend variable that is storing our chat history. In the onMessage frontend event handlers of our API, add a handler with the Set frontend variable action to set the messageHistory value to the following:
{{[
    ...messageHistory.value,
    {
      role: "assistant",
      name: "Claude",
      avatar:
        "https://theflint.media/wp-content/uploads/2024/11/ClaudeLogo.jpg",
      content: message.value,
    },
]}}
Earlier, we used the Send control block to stream the response of Claude back to our frontend. Here, we are accessing the response from the Send block with message.value in the content field of the above JSON.
Step 5: Allowing tools to make changes to the app frontend directly
Within the frontend event handler of our API, you can add Javascript as well to control the frontend of our application. In some cases, you may want to open a slideout or modal in order to confirm actions that a user is asking to take. For example - say we have a tool that drafts an email to send to a specific client. In this case, we want to open a confirmation modal, titled emailConfirmation, and populate a form using a frontend variable, titled emailContent. We can add an if condition to check whether our send_email tool has been used.
if (messageValue.tool == "send_email") {
  emailContent.set({
    subject: messageValue.emailSubject,
    body: messageValue.emailMessage,
  });
  emailConfirmation.open();
}
Superblocks offers a wide array of Run JS functions that allow you to have full control over the end user’s experience with the application as they call workflows and APIs using only natural language.
Conclusion
By combining Claude's natural language understanding with Superblocks' dynamic tool orchestration, we're able to create an easy to use, multi-functional, and deeply integrated chatbot in just a few hours. While Claude brings the cognitive layer—understanding context, interpreting intent, and making intelligent decisions, Superblocks provides the execution framework, allowing those decisions to ripple through databases, CRMs, and enterprise applications with unprecedented ease.
Stay tuned for updates
Get the latest Superblocks news and internal tooling market insights.
You've successfully signed up
Request early access
Step 1 of 2
Request early access
Step 2 of 2
You’ve been added to the waitlist!
Book a demo to skip the waitlist
Thank you for your interest!
A member of our team will be in touch soon to schedule a demo.
Table of Contents


.png)

%20(1).png)
.png)
